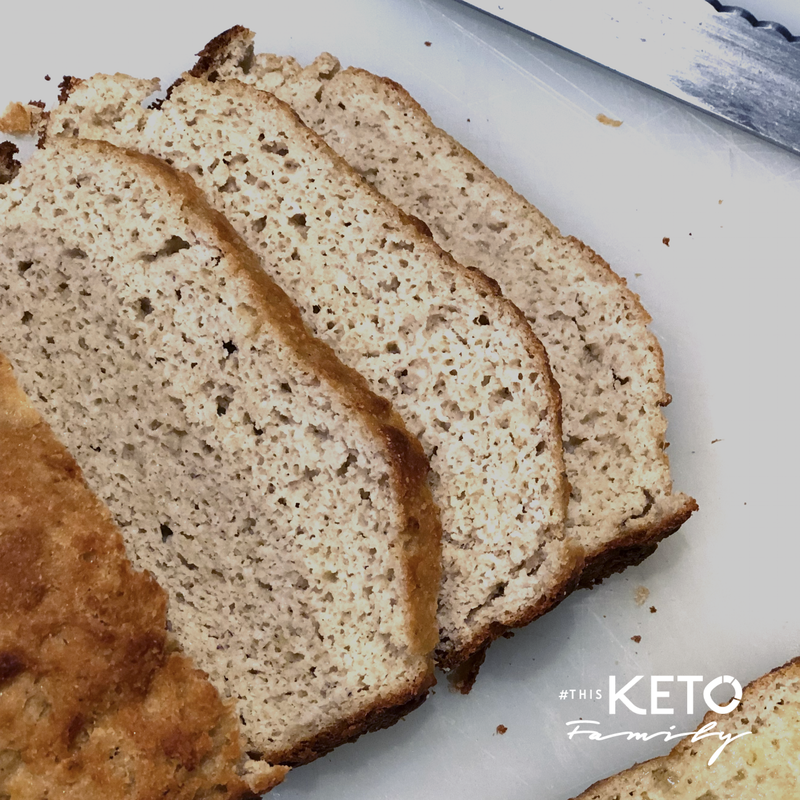
 Don't let this recipe intimidate you. I used to think making breads was challenging since I had never before worked with yeast. I also had never worked with Vital Gluten before so that was another uncharted territory. But let me tell you, both are ESSENTIAL to making this low-carb, Keto bread fluffy and soft. Here's why. Ketogenic flours are dense and heavy. They typically consist of almond flour and coconut flour, both of which are course and dry. Neither contain any starches in their makeup (which is what makes them ketogenic LOL) and because their particles are dense, they typically do not rise well. Enter Vital Gluten. Gluten in normal flour is responsible for the sponginess and chewiness of traditional flour bread. It is the protein component of wheat that is extracted and separated from all the starches. Therefore Vital Gluten (also called Wheat Gluten and Vital Wheat Gluten) is actually not 'wheat' at all, but the dried and milled protein. Because of this it is safe for ketogenic baking and supplements for the missing rise of traditional ketogenic flours. Yeast. Yeast are single-celled organisms that thrive on the starches in the flour/wheat and emit carbon dioxide. The carbon dioxide is what makes the pockets of air in traditional flour bread. Air equals rise and chewiness. The problem in ketogenic baking is, again, the keto flours do not contain starch (as traditional wheat flour does), so the yeast has nothing to feed off of. Activating your yeast is essential in keto baking because you will supply it with a small amount of sugar, in our case I use Yacon Root extract or syrup, so activate it. That's it. All you need to do is combine the ingredients, add a little elbow grease to mix them together, patience to allow it to rise and boom - the most amazing low-carb, no dairy, no egg, no-kneading and no bread machine required keto bread recipe there is. I hope you try this, because it is amazing. If you do, let us know how it turns out! Happy baking! Yields: 12 slices Ingredients: 1 cup almond flour 1/4 cup coconut flour 1/4 cup psyllium husk 1/2 cup vital gluten (also called Vital Wheat Gluten) 1/2 cup whey protein isolate 1 1/2 teaspoon salt 13 oz warm water (between 110°-115°) 1 1/4 teaspoon active dry yeast 2 teaspoons yacon syrup Directions:
Follow us on Social Media | Did you try the recipe? Tag us! @thisketofamily This Keto Family is a participant of the Amazon affiliate marketing programs, which means we may get paid commissions on editorially chosen products purchased through our links to retailer sites.
4 Comments
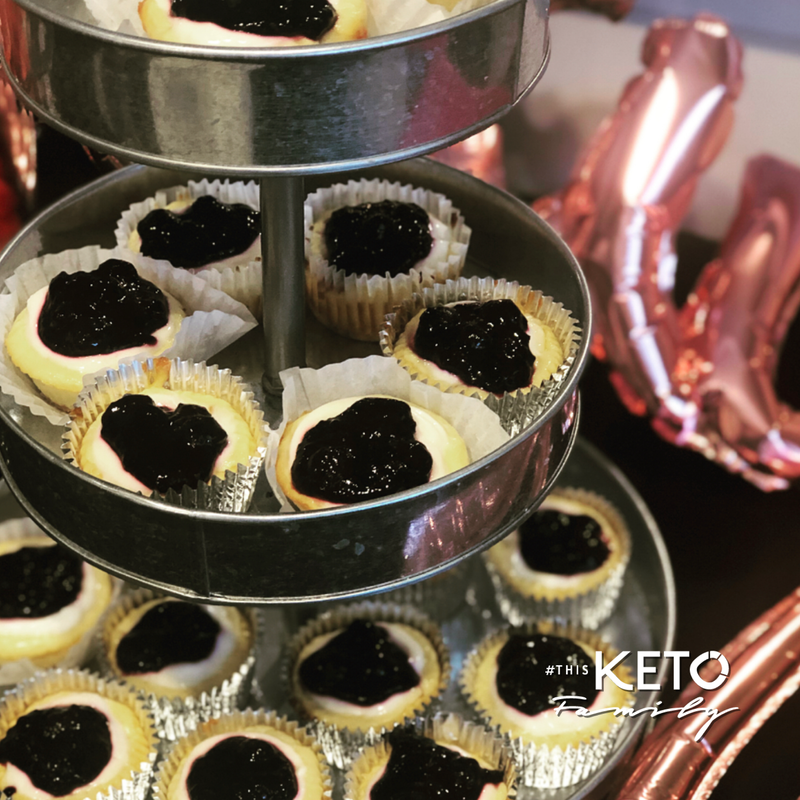
I never was a fan of fat bombs. Something about eating a cold, frozen ball of butter or coconut oil never appealed to me. If this is you, then look no further my friends. These mini cheesecakes—aside from being a great potluck item to bring or have at your next party—these beauties double as a kick butt keto fat bomb.
I kid you not, in the beginning when I first transitioned my family to keto, I would make a batch of these cheesecakes to keep in the fridge and have when I needed a sweet fix or to bump up my fat intake for the day. It almost felt sinful in the beginning to be able to eat a personal sized cheesecake EVERYDAY! As far as potluck worthy, YES! If you plan to bring this to a party make sure you make double the batch so you can save some at home for yourself because I guarantee that there will be none left! These beauties are super easy to make. There are a few steps since you have to bake the crust first and then top them once cooled, but I assure you that it will be all worth it. The best part? Each mini cheesecake is approximately 2.61 net carbs!!!! (Woohoo, happy dance). Before keto I used to make these S.A.D equivalent ("Standard American Diet" equivalent which means with "normal" ingredients and "normal" sugar). Can you guess how many carbs/sugar one "normal" mini cheesecake set you back? 21 grams!! These keto mini cheesecakes are one-tenth the net carbs as a normal one! Wow—I'll take sugar free and keto all day, every day. Do yourself a favor. Pick 1 Sunday afternoon and make these for yourself for the week. Hide them from your family members who aren't keto (or else they'll eat your stash LOL). You're welcome! Tools you'll need
20 mini cheesecakes Ingredients: 4 8-oz blocks cream cheese, room temperature 4 eggs, room temperature 1 cup allulose sweetener 1 teaspoon vanilla extract 1 cup almond flour 1/3 cup Swerve sweetener 3 tablespoons butter Ingredients–Topping: 1 8-oz tub sour cream 1 tablespoon Swerve sweetener 1 teaspoon vanilla extract 1 10-oz bag frozen blueberries 1/2 lemon, juiced 1/2 cup water 3/4 cup allulose sweetener xanthan slurry *Ingredients—Xanthan Slurry: 2 teaspoons coconut oil (or olive oil) 1/2 teaspoon xanthan gum Directions:
USE OUR FAVORITE BRANDS + PRODUCT
Follow us on Social Media | Did you try the recipe? Tag us! @thisketofamily
This Keto Family is a participant of Amazon and other affiliate marketing programs, which means we may get paid commissions on editorially chosen products purchased through our links to retailer sites.
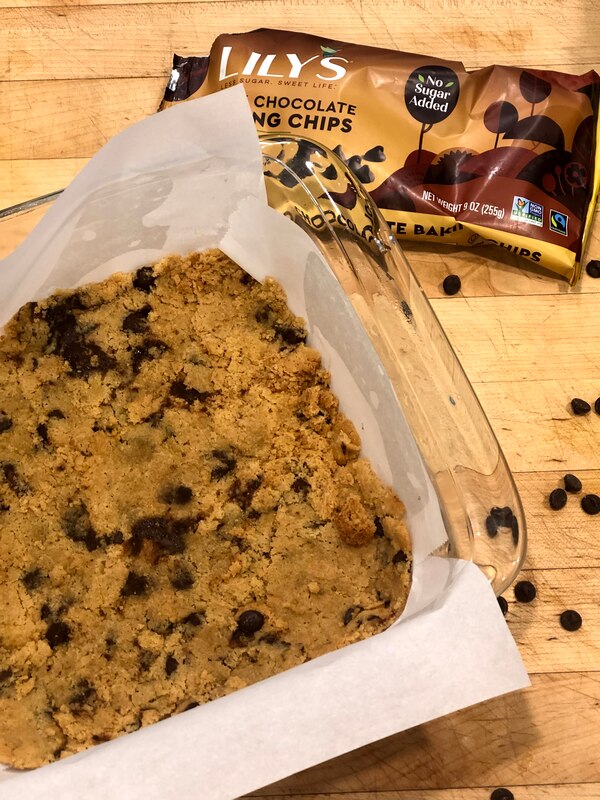
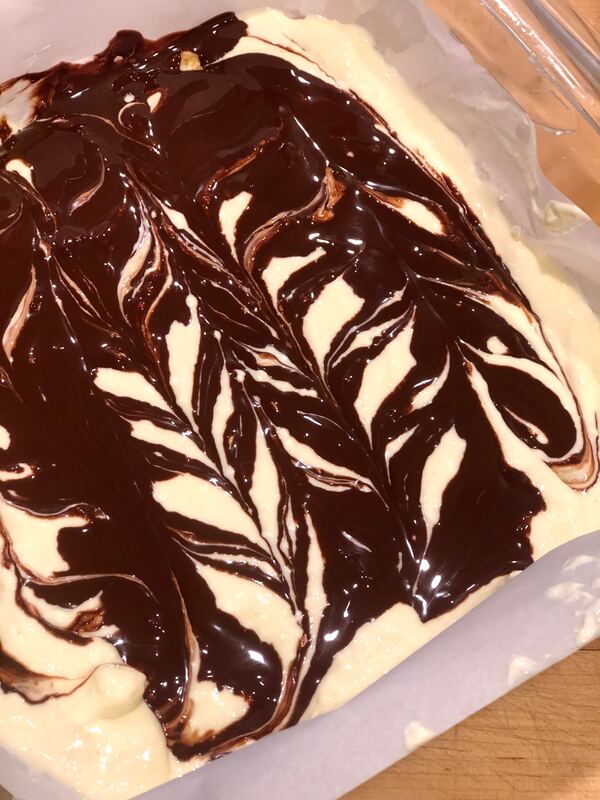
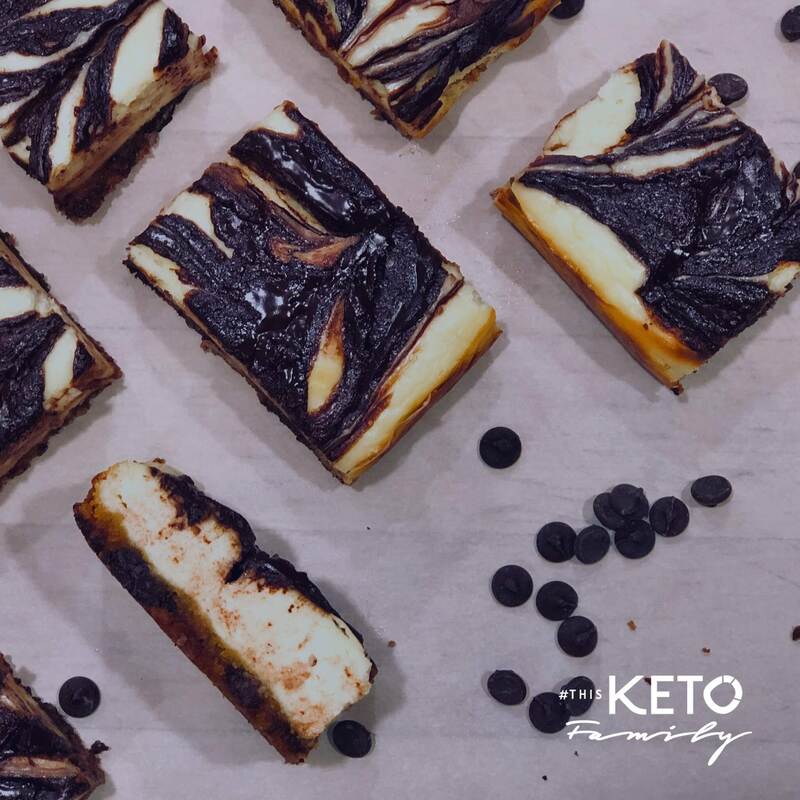 I hate wasting food and love the idea of using leftovers for something new. The other day we made Keto Chocolate Chip Cookies (click for my recipe) and they were delicious, but the recipe yields about 24 cookies. After eating cookies for 4 days in a row, one can become "cookied-out". LOL –hard to image I know. We still had 5 cookies left and since I hate wasting, I wanted to repurpose them. I was debating a cookie ice cream, but decided these cheesecake bars were better! They hit the spot and I love the cookie bottom. Adds a little something extra to these. I used Lily's dark chocolate chips in these (my kids, actually like the taste now), but feel free to use milk chocolate if you want a sweeter end-product. The dark is obviously more keto-friendly, but if that isn't your focus, then go for milk chocolate. Next time I think I'm trying a white chocolate, raspberry cheesecake so stay tuned for that! Makes: 12 Bars Ingredients: 5-6 chocolate chip cookies (or make my Keto Chocolate Chip cookies recipe here) 2 blocks cream cheese, room temperature 2 Eggs room temperature 1/4 Cup + 2 Tablespoons Swerve sweetener 1/2 Teaspoon Vanilla extract 1/4 Cup Lily's chocolate chips 1 Teaspoon Coconut oil Directions:
Follow us on Social Media | Did you try the recipe? Tag us! @thisketofamily This Keto Family is a participant of the Amazon affiliate marketing programs, which means we may get paid commissions on editorially chosen products purchased through our links to retailer sites.
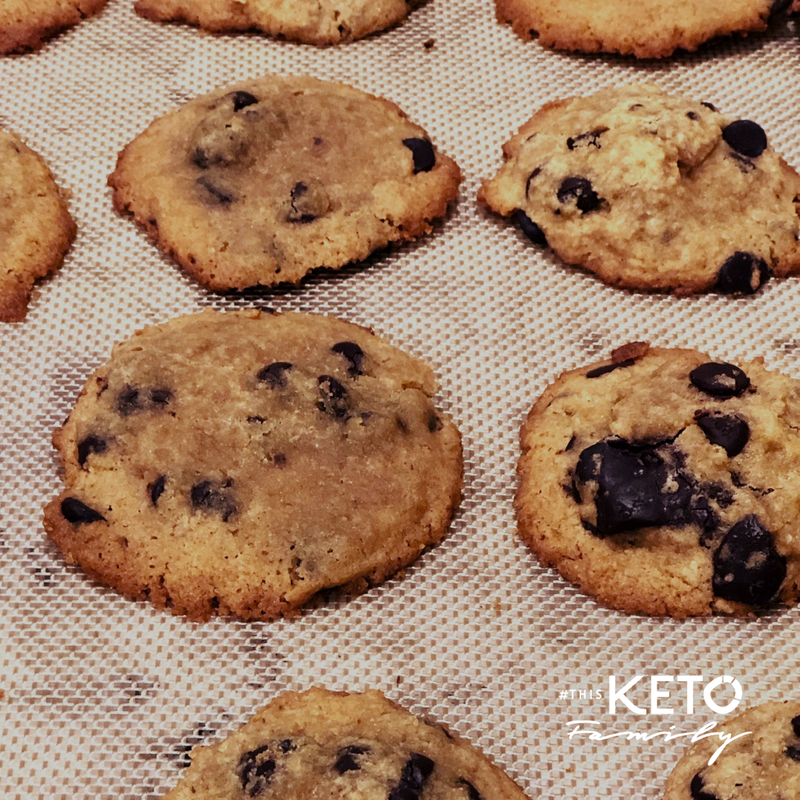 Who doesn't love chocolate chip cookies? I know the first things I craved to learn to master when I transitioned into keto was keto desserts. I mean if I was going to make this a lifestyle, my new keto life better include some delicious desserts. This was one of the first desserts I worked to master. The secret? The brown-butter and coffee! These two ingredients really make a different in the flavor profiles of these cookies. If you've tried other recipes that were so-so, then you need to try this one. It will not disappoint! Also, I suggest making the entire batch, getting them all mixed and freezing them. Then you can pop a few in the oven anytime you need a cookie fix. Or better yet, make mini frozen cookie doughs (about half the size of a normal cookie portion) and eat is as a keto fat bomb straight from the freezer. Yup! You know I do that LOL. Ingredients: 1 cup almond flour 1/4 cup + 2 tablespoons coconut flour 1/4 teaspoon xanthan gum 1/4 teaspoon salt 1/2 teaspoon baking soda 1/2 teaspoon baking powder 1 cup Kerry Gold butter, browned (see steps 1-2) 1/4 cup Swerve Brown 1/4 cup Swerve 1 teaspoon vanilla 2 teaspoon coffee (optional) 1 egg + 1 egg yolk 1/2 cup Lily's dark chocolate chips 3 oz dark chocolate, roughly chopped (adds texture and visual aesthetics) Directions:
Follow us on Social Media | Did you try the recipe? Tag us! @thisketofamily This Keto Family is a participant of the Amazon affiliate marketing programs, which means we may get paid commissions on editorially chosen products purchased through our links to retailer sites.
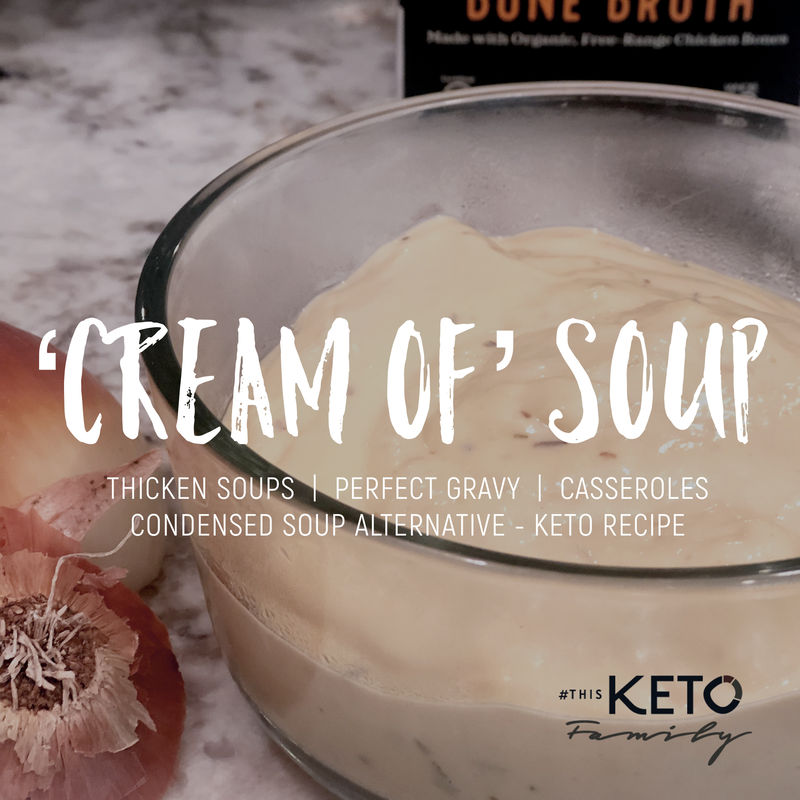 When I went Keto I had not idea what was in store for me. This lifestyle opened my eyes to many hidden ingredients in the foods, condiments and ingredients I had grown to love and use every single day. I lovingly made meals for my three children and husband only to find out that the foods and ingredients I was giving them may have contributed to their allergies, hormonal imbalances and more. I began to review and scrutinize food labels (as we all should) and began educating myself on our agriculture ecosystem from ground to plant to harvest to supermarkets to our plates. There was a life-cycle there touched in many stages by pesticides, herbicides and ultimately preservatives. One such area of scrutiny was the cream of mushroom soups that I had been using as my base for my pasta dishes, stews, casseroles and gravy. Not only did a small can yield 20 grams of Net Carbs (a BIG NO NO for Keto), but the second ingredient was inflammatory-causing vegetable oils (YUCK! Another BIG Keto NO). I wasn't going to give up my creamy-rich foods so I decided to ketofy a "Cream Of" soup recipe. The result? A passable, very comparable "Cream Of" soup alternative that cooks the exact same way as a can of cream of mushroom will. Use it as you would normally — add it to a cup of chicken bone broth and have a great soup base; simply add protein and veggies. Or add it to a stew, in a crockpot or Instantpot, and achieve the creamy gravies of times past. Now I always have a cup in the fridge to use when I can. Next thing I'll learn is canning so I can make several batches and can then for longer period use. If you're a canner, PM me. =) Hope this helps you get back your classic recipes and gives you hope that anything can be made keto. Keto-On!! Ingredients: 1/2 cup heavy whipping cream 1 cup whole milk (or for less carbs, use all hwc) 3 teaspoons Xanthan Gum paste* 2 tablespoons butter 1/2 teaspoon salt 1/2 teaspoon garlic powder 1/2 teaspoon onion powder 1 teaspoon Worcestershire sauce Xanthan Paste: 1 teaspoon Xanthan Gum 3 teaspoon coconut oil Directions:
Follow us on Social Media | Did you try the recipe? Tag us! @thisketofamily This Keto Family is a participant of the Amazon affiliate marketing programs, which means we may get paid commissions on editorially chosen products purchased through our links to retailer sites.
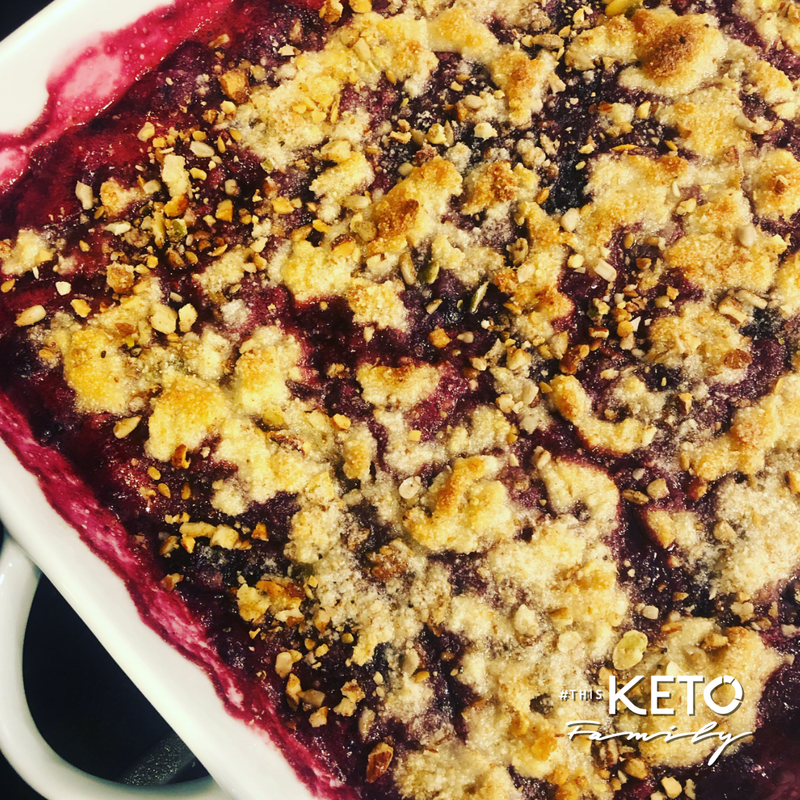
So it has been said that summer hasn't started yet until a good cobbler pie is made, haha. My general philosophy is that there is always room for a good cobbler. The keto berry cobbler recipe is a great one that even non-keto guests would enjoy.
Use fresh or frozen berries of your choice. Thicken it up and then top it off with a almond flour crumble. Bake it until its golden and bubbly and serve it with a side of Keto ice cream! A yummy fruit dessert that is keto friendly and delicious. Ingredients–Berry Filling: 16 ounces fresh or frozen berries Xanthan gum slurry* 1/2 lemon , juiced 2/3 cup allulose sweetener pinch of salt Ingredients–Topping: 1 cup almond flour 2/3 cup Swerve sweetener 4 tablespoons butter 1/4 cup Highkey granola (optional) *Ingredients—Xanthan Slurry: 3 teaspoons coconut oil (or avocado oil) 1 teaspoon xanthan gum Directions:
USE OUR FAVORITE BRANDS + PRODUCT
Follow us on Social Media | Did you try the recipe? Tag us! @thisketofamily
This Keto Family is a participant of the Amazon and other affiliate marketing programs, which means we may get paid commissions on editorially chosen products purchased through our links to retailer sites.
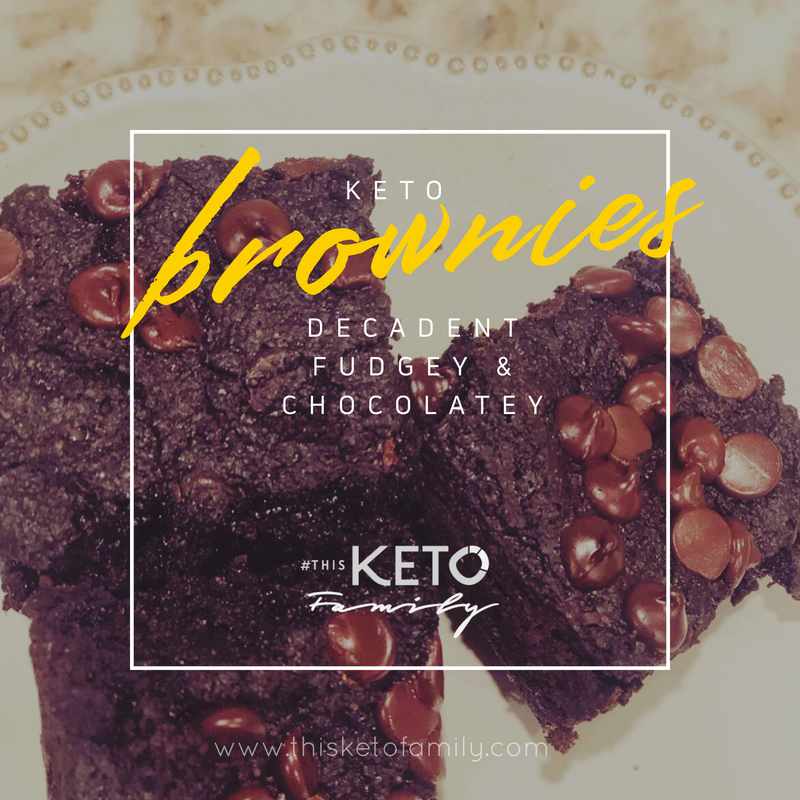 Brownies have a way to making things better. They're warm and gooey and so comforting. Most baked Keto goods are either too eggy or too dry and many keto brownie recipes online fall short — but not this one. If you are searching for a rich, dark, fudgy, chocolatey Keto dessert, then this is for you. I decided to use black cocoa powder for a rich, dark flavor and color. The chocolate chips inside the batter and on top of the brownie offer a nice contrast in color and enhancement of flavor. So what you may ask gives this decadent dessert its fudgy middle? An extra egg yolk. That's it. This recipe is super easy and comes together in under 20 minutes (including bake time). Try to resist eating it right out of the oven. As with any keto baked good, you need to let the item rest and set for at least 15 minutes. Difficult I know, but the wait is worth it—I promise! Ingredients: 1.5 cups almond flour 1/2 cup black cocoa powder 1/2 cup allulose sweetener 1/4 teaspoon xanthan gum 1/4 teaspoon salt 1 tablespoon baking soda 1 egg, plus 1 egg yolk 3/4 cup coconut cream (or heavy whipping cream) 1/2 cup Lily's chocolate chips, divided Directions:
Follow us on Social Media | Did you try the recipe? Tag us! @thisketofamily This Keto Family is a participant of the Amazon affiliate marketing programs, which means we may get paid commissions on editorially chosen products purchased through our links to retailer sites.
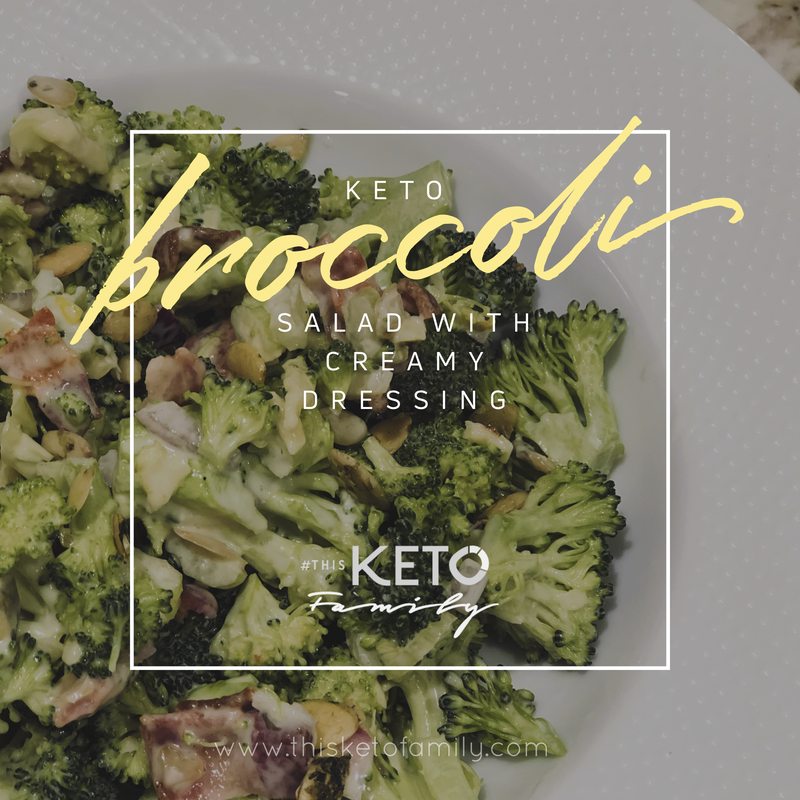 The weather is starting to get warmer and little league is creeping around the corner. For our family it means many meals out in the open air picnic style. For me this gets me to start thinking about portable, packable meals that are delicious and, of course, keto-friendly. I used to make this broccoli salad pre-Keto. I used sugar and honey and added dried cranberries or raisins to it. Sometimes I added apples for a bit of crunch. In true keto-me-challenge fashion, I decided to make a keto version that was equally as delicious and filling. It's an easy recipe that tastes even better as the ingredients sit and the flavors combine, perfect for a outdoor picnic or lunch on the go. (Note: I make a generous portion because I eat it for days – lunch, dinner, snack...haha) Ingredients: 4-5 cups of chopped broccoli florets 8-10 strips of cooked bacon, crumbled 3 stalks of celery, chopped 1/2 red onion, choppped 1/2 cup shredded cheddar cheese 1/2 cup sprouted pumpkin seeds Dressing Ingredients: 1 cup avocado mayo 1 tablespoon sour cream 1 tablespoon white wine vinegar 2 tablespoon Monkfruit sweetener pinch of salt Directions:
Follow us on Social Media | Did you try the recipe? Tag us! @thisketofamily This Keto Family is a participant of the Amazon affiliate marketing programs, which means we may get paid commissions on editorially chosen products purchased through our links to retailer sites.
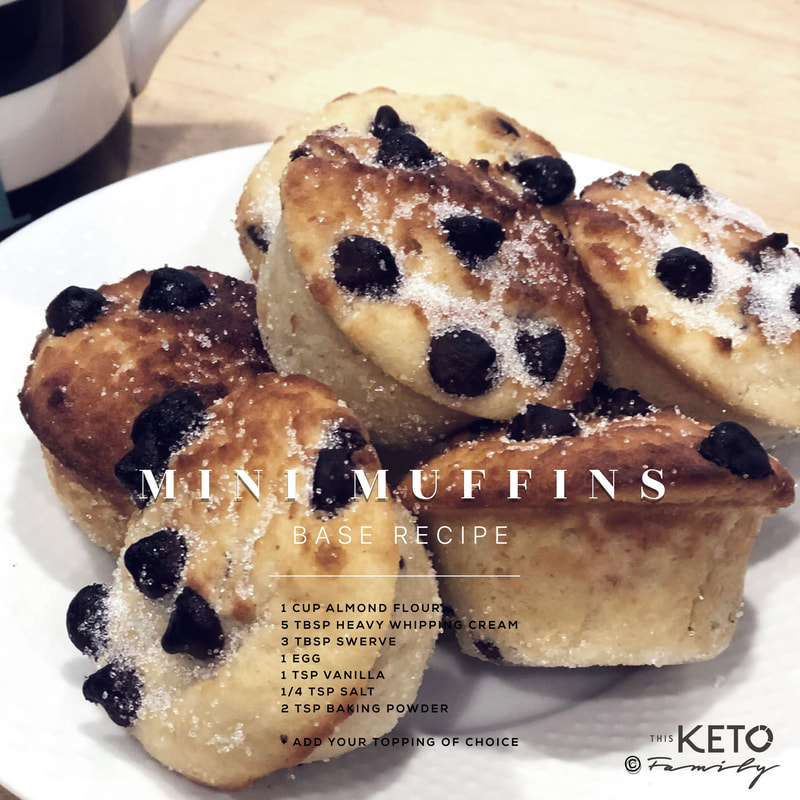 This muffin recipe is super versatile. I use it as the base for many of my baked goods because the result is a moist and fluffy cake that isn't too sweet. This means you can add whatever topping you like. Add some lemon zest and a tablespoon of lemon juice (or 2 drops of Young Living Lemon Essential Oil—my preferred route) and 1/3 cup of fresh blueberries for a yummy lemon-blueberry flavor. Or add a half cup of Lily's Dark Chocolate Chips for a keto chocolate muffin version. Or go full chocolatey goodness with a double-chocolate muffin by adding subbing the base flour with 3/4 cup almond flour and 1/4 cup of unsweetened baker's powdered cocoa. Add in some chocolate chips and another tablespoon of swerve and boom, a keto double-chocolate muffin that tastes sinful with less than 2gram Net Carbs per serving! Have fun with your toppings and flavors. With this base recipe, the sky's the limit! Yields: 12 mini muffins Ingredients: 1 cup almond flour 5 tablespoons heavy whipping cream 3 tablespoons Swerve 1 egg, lightly beaten at room temperature 1 teaspoon vanilla 1/4 teaspoon salt 2 teaspoons baking powder Directions:
Follow us on Social Media | Did you try the recipe? Tag us! @thisketofamily This Keto Family is a participant of the Amazon affiliate marketing programs, which means we may get paid commissions on editorially chosen products purchased through our links to retailer sites.
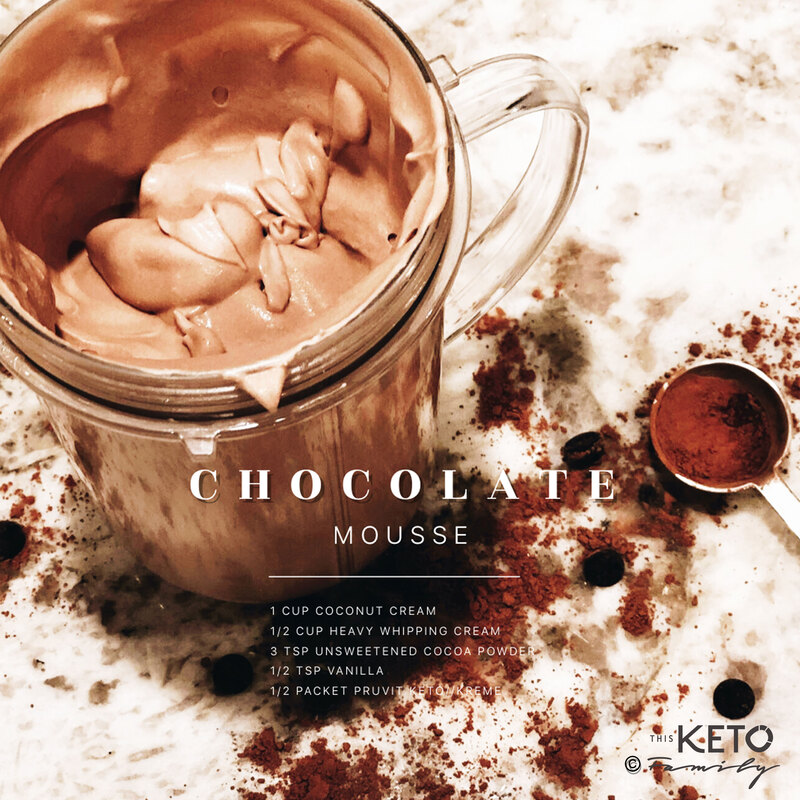 When you have 3 young kids speed is the name of the game, especially after dinner and when dessert is involved haha! I love the versatility of this dessert which can be eaten as is as a light and airy chocolate mousse or can be a nice filling to a quick chocolate mouse crepe. Top it off with some strawberry slices and a dusting of Swerve confectioner's sweetener and it's a dessert no one wants to miss. Everyone in family loved this. It's not too dense and its lightly sweet. I decided to use Pruvit Venture's Keto//Kreme packet for this recipe for (1) all the good MCT oils and fats and (2) simplicity. I already new the Keto//Kreme tasted good, so why not use it in a dessert. I love sharing the recipe to my 10-Day Challengers because its a simple dessert that satisfies any sweet tooth craving. And since its high in healthy fats, it will leave you feeling satiated for a long time. Serving Size: 2 Ingredients: 1 cup coconut cream** 1/2 cup heavy whipping cream 3 teaspoons unsweetened cocoa powder 1/4 teaspoon vanilla extract 1/2 packet of Pruvit's Keto//Kreme **If you sub out the coconut cream with unsweetened Almond milk, and warm it on the stovetop, you can have a yummy, creamy chocolate milk. Directions:
Need more info on Keto//Kreme? Contact me for more information. Follow us on Social Media | Did you try the recipe? Tag us! @thisketofamily This Keto Family is a participant of the Amazon affiliate marketing programs, which means we may get paid commissions on editorially chosen products purchased through our links to retailer sites.
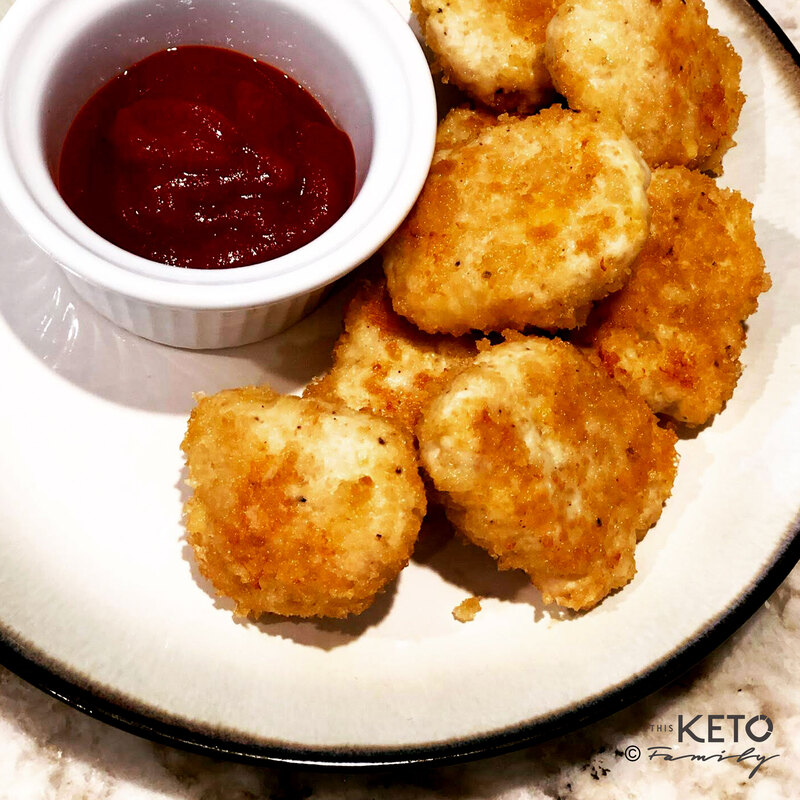  I've been a bit behind on my recipe posts lately, but this is one for the books, especially for all keto parents out there who are working hard to set the right example for our kids. Yesterday my son had a friend over for a play date. On the way to our house we passed by McDonalds and my son's friend asked if we were going to get something to eat. I said, "Nah, I'll make you chicken nuggets at home." What could be hard about it, kind of like a meatball but made of chicken, right? So there I was committing myself to homemade chicken nuggets. I rolled up my sleeves and started my experiment. I only had chicken breasts so that's what I used (in the recipe I note to use half breast and half thighs to make sure they are tender and juicy). I also used my small convection oven, but I think a normal oven would have been better. I served the nuggets with a variety of dipping sauces: sugar-free ketchup, sugar-free BBQ sauce and my very own ranch dressing recipe and ta-da, lunch was served. The best part? The process was super simple and I had all the ingredients in my kitchen already. Not to mention I could ensure the best quality ingredients. Yippee for keto food challenges! Ingredients: 2 pounds boneless, skinless chicken, roughly chopped (1 large chicken breast and 2-3 chicken thighs recommended) 1/2 cup panko pork rind crumbs (try this brand), Plus additional 1/4 cup for breading. Or you can smash your own. This option just saves time. =) 1 oz cream cheese 1/2 cup shredded cheese (whatever your have. I used raw cheddar in this) 1 egg 1/4 teaspoon salt 1/4 teaspoon pepper 1/2 teaspoon garlic powder Directions:
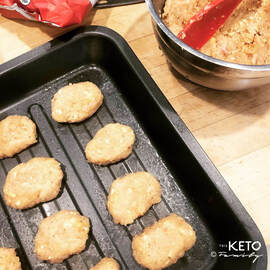
Directions for freezing:
Follow us on Social Media | Did you try the recipe? Tag us! @thisketofamily This Keto Family is a participant of the Amazon affiliate marketing programs, which means we may get paid commissions on editorially chosen products purchased through our links to retailer sites.
|

AuthorHi! I'm Arlene – wife, mother of 3, entrepreneur and keto foodie. I love to make, share and try different, delicious keto food recipes that are easy to make and most-importantly kid-friendly. Life is hard as it is, feeding our families should be easy, fun and nutritious. Archives
December 2020
Categories
All
|
 RSS Feed
SERVICES |
Recipes |
About |
CONNECT with Us |
©2019-2022 THIS KETO FAMILY ALL RIGHTS RESERVED. | PRIVACY POLICY & DISCLOSURES | CLIENT LOGIN