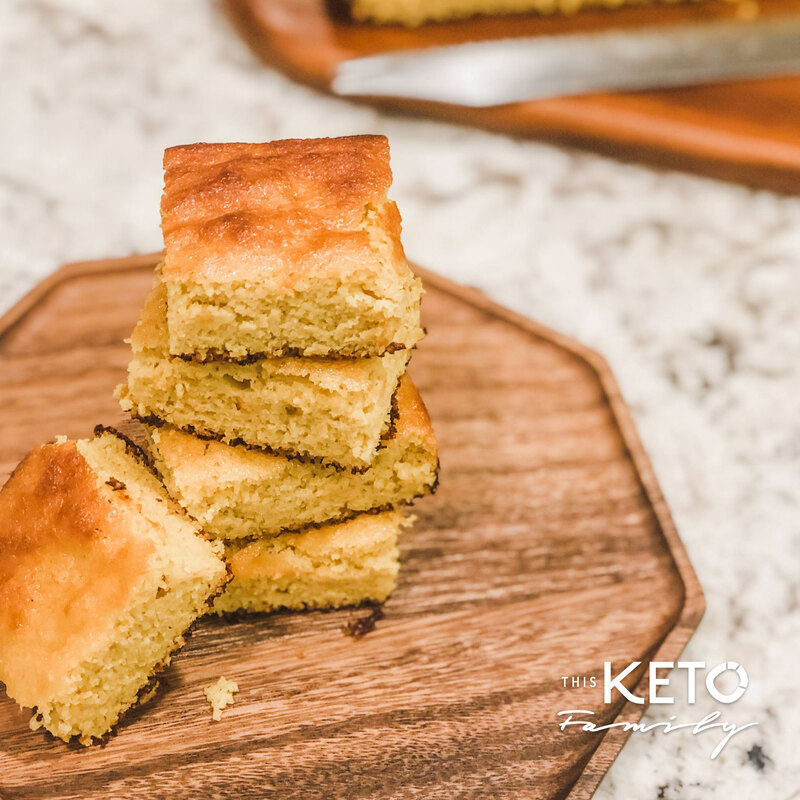
When fall rolls along and the colder weather begins, chili starts making its entrance into our weekly food menu. What goes better with chili than cornbread? When going keto, you can no longer make this food item from that little blue carton since corn is off the table. But how can we get a yummy, sweet bread to eat with our chili.
Enter this easy, mock cornbread recipe that I worked to perfect for several months. The way to get the fluffy airy bread texture is to use yeast, yup. If you’ve ever used yeast before it can appear daunting, but I assure you that its sooo easy once you have one or two yeast recipes under your belt. Yeast and Sugar You will need to activate your yeast with sugar. Yes sugar. It doesn’t work with any keto sweeteners like Swerve or allulose. It DOES however slightly work with Yacon Syrup but your bread will have a slightly different flavor in the end, not bad, but just different. So back to the sugar. Yes, you will need to use 2 teaspoons of white sugar. Don’t worry because the yeast will consume the sugar and release gas once it “proofs” or activates. This gas is what gives the bread its rise and the delicious air bubbles within the dough. Trust me when I say you can't really replace this, the final product won't really be the same. Serves: 16 Ingredients: 1 1/3 cups lukewarm water (about 100º F) 2-3 teaspoons sugar 2 ¼ teaspoon Instant Yeast 1 cup almond flour ¾ cup whey protein isolate 3 tablespoons coconut flour 2 tablespoons coconut oil ½ teaspoon Xanthan gum ½ teaspoon salt 1 ½ teaspoon baking powder ½ cup Allulose ½ teaspoon turmeric powder 1 tablespoon Yacon Syrup Honey Butter Ingredients: 4 tablespoons butter, softened 1 tablespoon Yacon syrup Directions:
Net Carbs: 1.75g per serving (1 slice) Net carb calculations are approximate and depend greatly on the brands and ingredients used. Net carbs are provided to provide a ballpark calculation. Use a carb calculator app to find your exact net carb count.
Make it with our current product favs
Follow us on Social Media | Did you try the recipe? Tag us! @thisketofamily
This Keto Family is a participant of the Amazon and other affiliate marketing programs, which means we may get paid commissions on editorially chosen products purchased through our links to retailer sites.
0 Comments
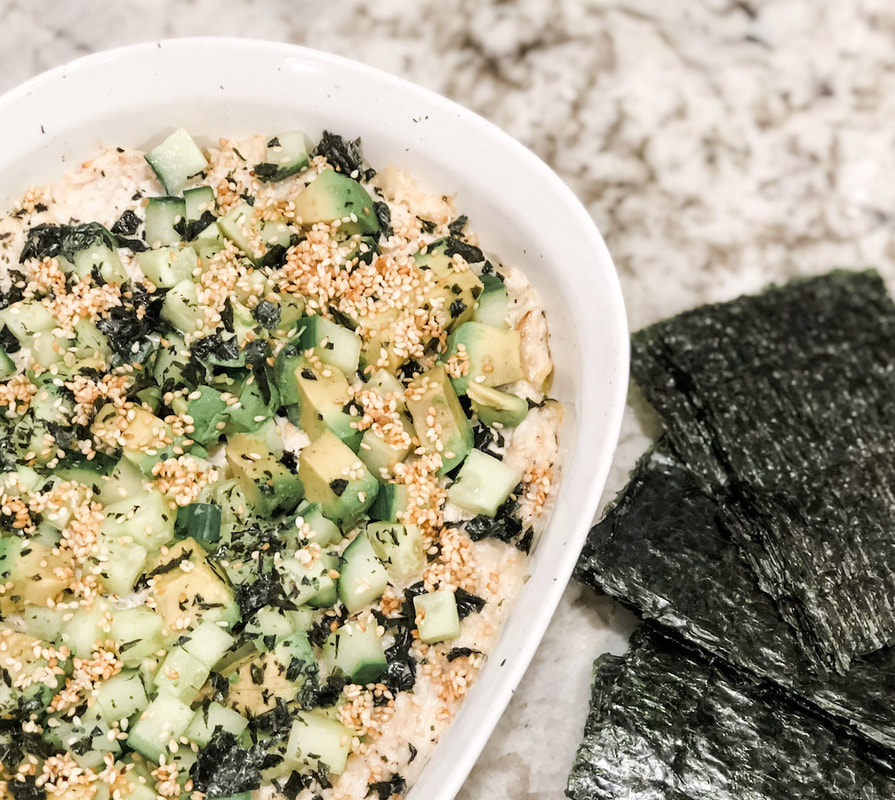
Tired of the same keto appetizers for your parties? Wow your guests with this ketofied version of an easy crab sushi bake. This recipe is so light and tasty that your guests will keep coming for more. This can also serve as an excellent side dish to an Asian-inspired dinner at home. With so many ingredients being a keto-staple item, this dish is easy to whip up most any night of the week.
The incredibly versatile cauliflower. For this recipe I use cauliflower rice to replace the traditional rice found in sushi. By adding some cream cheese, the cauliflower sticks together like sticky rice and does a great job substituting for the job. If you love a lot of "rice" in your sushi or sushi bakes, then I'd recommend that you double the rice ingredients in this recipe and go from there. Complexity This recipe is EASY. Don't be intimidated by the layers and the fancy presentation. There's nothing inherently hard about mixing the ingredients or frying an omelet. Once you get all your ingredients together and have your layers prepped and ready, the task of layering and putting together this dish is super simple. I love dishes that look like I spent all day making them, LOL. We eat with our eyes first, friends! Real Crab Meat is a MUST Don't skimp here my keto friends. Most sushi bakes (non-keto) you see online use imitation crab instead of fresh crab meat. As a fully keto-approved recipe, there is no substitution here unfortunately. Imitation crab meat is generally made from pollock fish that has been processed, minced and put together using additives and other ingredients. Imitation crab contains potato starches to bind the minced pollock as well as sugar and vegetable oils to help extend its shelf life—all 3 ingredients that are a huge NO in the keto diet world. Real crab meat also contains for nutrients like vitamin B12, zinc, selenium and omega-3 fatty acids. Score for the healthy fats. Alternatives Though I haven't tried it, I'm think this may work out great with minced lobster or shrimp if you don't like crab. Either way, this dip is sure to please. ENJOY! Serves: 2-3 People Ingredients: 1 package frozen riced cauliflower (about 10 oz) 1/3 cup crab meat 4 eggs 4 ounces cream cheese, softened, divided 1 tablespoon avocado oil 1 tablespoon + 2 teaspoon rice wine vinegar, divided 1 tablespoon sesame seeds, divided 2 tablespoons avocado mayo 2 tablespoons allulose 1/2 avocado, diced 1/2 english cucumber, diced Nori Sheets (seaweed sheets) Furikake seasoning Pinch garlic power salt and pepper to taste Directions:
Make it with our current product favs
Follow us on Social Media | Did you try the recipe? Tag us! @thisketofamily
This Keto Family is a participant of the Amazon and other affiliate marketing programs, which means we may get paid commissions on editorially chosen products purchased through our links to retailer sites.
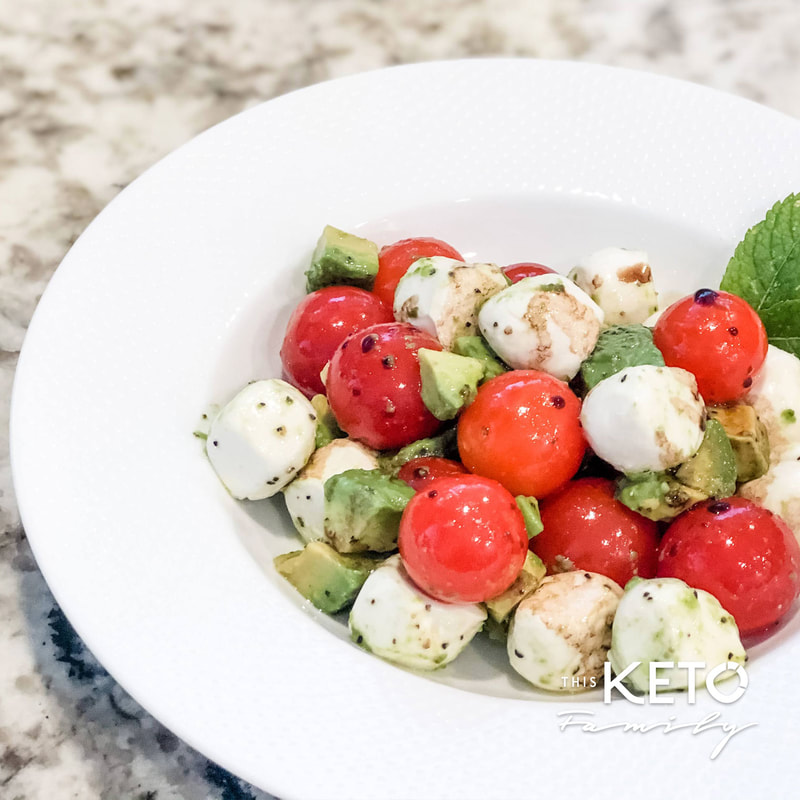 Some days I don't feel hungry enough for a huge, complex lunch. Other days I just want something fresh and light and boy does this do the trick. This is one of my go-to salads especially during the summer months when our backyard garden is plentiful and we harvest cherry tomatoes by the bowlful daily. The avocado and mozzarella offer you enough healthy fats to keep you full and satiated until dinner time. Add a grilled chicken thigh and this will be one power-play lunch. Its super easy and comes together in 5 minutes! Serves: 2-3 Ingredients: 8 oz fresh mozzarella cheese balls 10-12 cherry or grape tomatoes 1/2 avocado, diced 4 ounces cream cheese, softened, divided 1 tablespoon balsamic vinegar 2 tablespoons olive oil Basil leaves (for garnish) salt and pepper to taste Directions:
Follow us on Social Media | Did you try the recipe? Tag us! @thisketofamily This Keto Family is a participant of the Amazon and other affiliate marketing programs, which means we may get paid commissions on editorially chosen products purchased through our links to retailer sites.
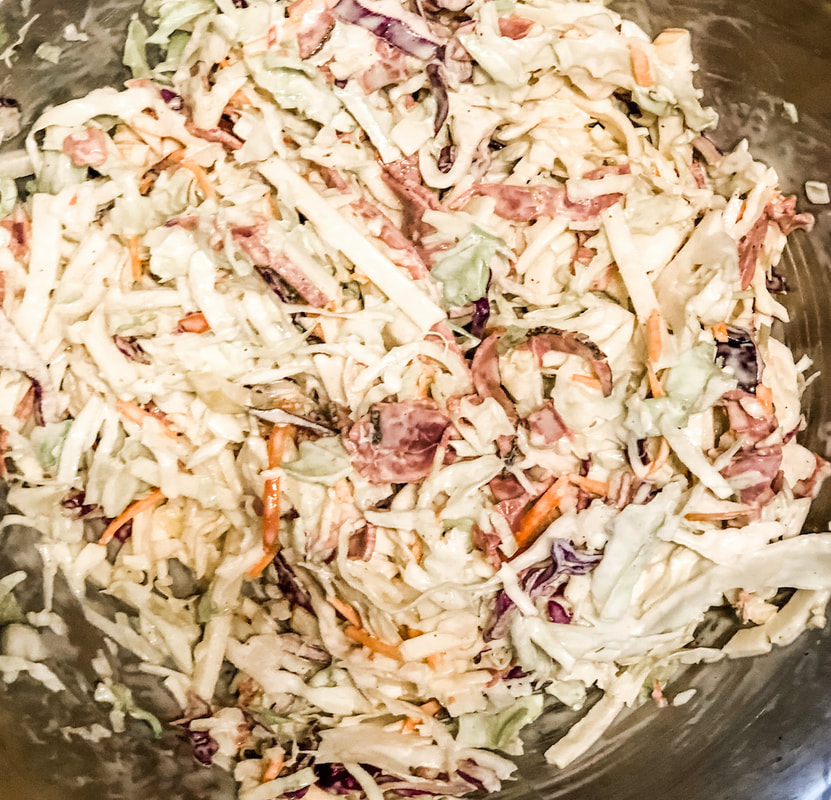
You probably see the carrots in the photo and are first to exclaim that carrots are NOT KETO.... LOL (Hello keto police ;-)) Yes, I know. But when you are a busy mom of 3 and you can buy a bag of pre-shredded cabbage/coleslaw mix at the store, you deal with a few shreds of carrots. LOL. Remember my friends, Progress Over Perfection. We used to go to this great little restaurant in our area that made coleslaw with green apples. They were so tart and crisp and offered a nice sweet crunch to the slaw. Since apples are out on keto, I decided to use jicama!!! Fresh jicama (don't buy the precut ones in the tubs because chances are they are dry and older) is best. Buy the jicama root and peel and chop it yourself. It'll be sweeter and crispier. This surprise ingredient is keto friendly and offers a nice crunchy, sweetness to any keto coleslaw recipe! Enjoy! Ingredients: 1 package coleslaw 1/2 cup jicama, julienned sliced 1/2 lb pastrami 4 oz swiss cheese, grated Dressing Ingredients: 1 cup avocado mayo 2 tablespoons sour cream 2 tablespoons white wine vinegar 3-4 tablespoons Monkfruit sweetener 1/4 teaspoon onion powder pinch of salt Directions:
Follow us on Social Media | Did you try the recipe? Tag us! @thisketofamily This Keto Family is a participant of the Amazon and other affiliate marketing programs, which means we may get paid commissions on editorially chosen products purchased through our links to retailer sites.
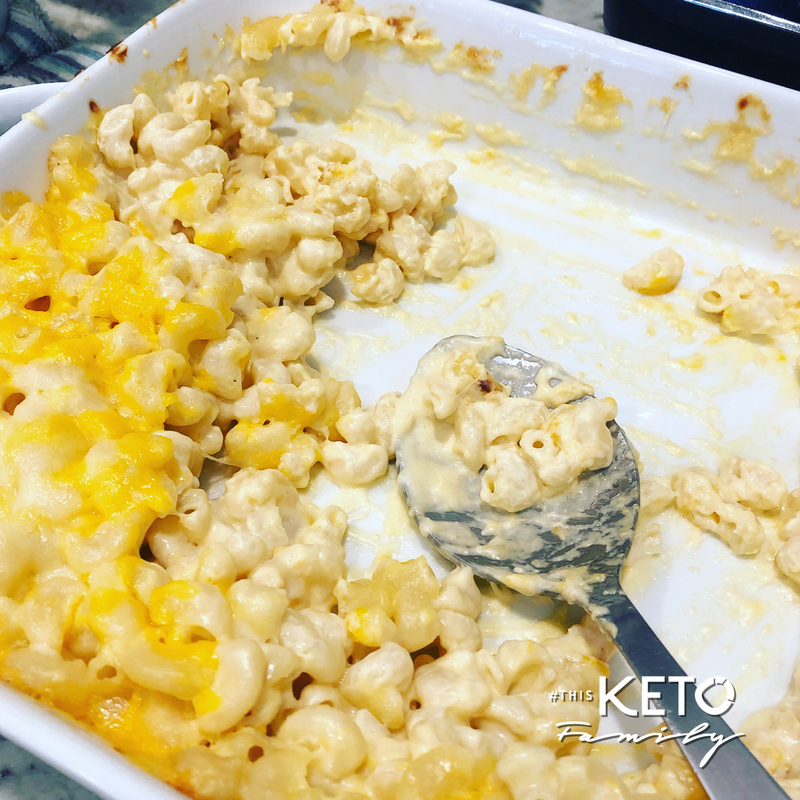
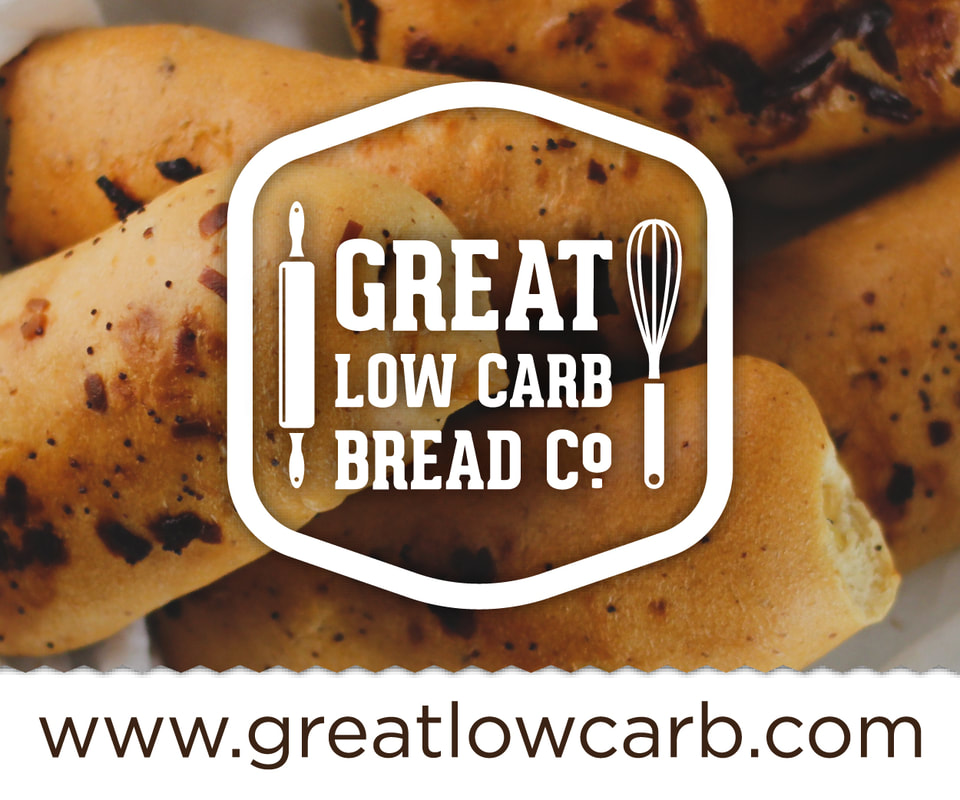
When I first transitioned to Keto, the one thing I missed the most at first was pasta. The one thing my kids still ask for on a regular basis, especially my oldest daughter, is....pasta. Now if a mom in her mid-30s was having a hard time giving up pasta when going keto, what could I expect from my then 6-year-old daughter?
I tried everything to substitute for pasta--black bean pasta (which was beans I know, but it only had 8g of Carbs per serving and for my low carb kiddos, that was good enough for me), zucchini noodles, and shirataki noodles (we've tried every single brand and the best is my opinion is Well Lean). I even made my own gnocchi pasta recipe (which satisfied a pasta fix, but was not the same as elbow macaroni). Everything worked out OK, but just never compared to the real deal. I get it, pasta is chewy and has a certain bite to it that until now, no real keto product could rival. Enter the Great Low Carb Bread Co.! They carry an AMAZING line of low carb and gluten-free pastas and breads for purchase. The reason we love GLCBC is because they focus on using the highest quality ingredients such as almond flour, flax meal, oat fiber and olive oil. The net carbs are decent (this particular recipe net carbs is 7g net carbs per serving), so if you are careful with your carb intake for the rest of your day, then this can be a nice treat here and there. If you ever need keto comfort food, this is it. My 4-cheese version is such an easy recipe and delivers all the right fats for a great keto meal or side dish. If you are going to have pasta, you MUST get it from Great Low Carb Bread Co. It will change your keto life LOL —> Click on my link to shop their products! 
Ingredients:
16 oz low carb elbow macaroni 2 tablespoons grass-fed butter 1/2 teaspoon xanthan gum (optional) 1 cup heavy whipping cream, room temperature 1 cup whole milk, room temperature 1 cup white cheddar cheese, grated 1/2 cup sour cream 1 3/4 cup sharp cheddar cheese, grated and divided 4 oz cream cheese 1/2 cup grated parmesan cheese 1/2 teaspoon garlic powder salt and pepper to taste 1/8 cup crushed pork rinds (for garnish—optional) Directions:
TIPS:
USE OUR FAVORITE BRANDS + PRODUCT
Follow us on Social Media | Did you try the recipe? Tag us! @thisketofamily
This Keto Family is a participant of the Amazon and other affiliate marketing programs, which means we may get paid commissions on editorially chosen products purchased through our links to retailer sites.
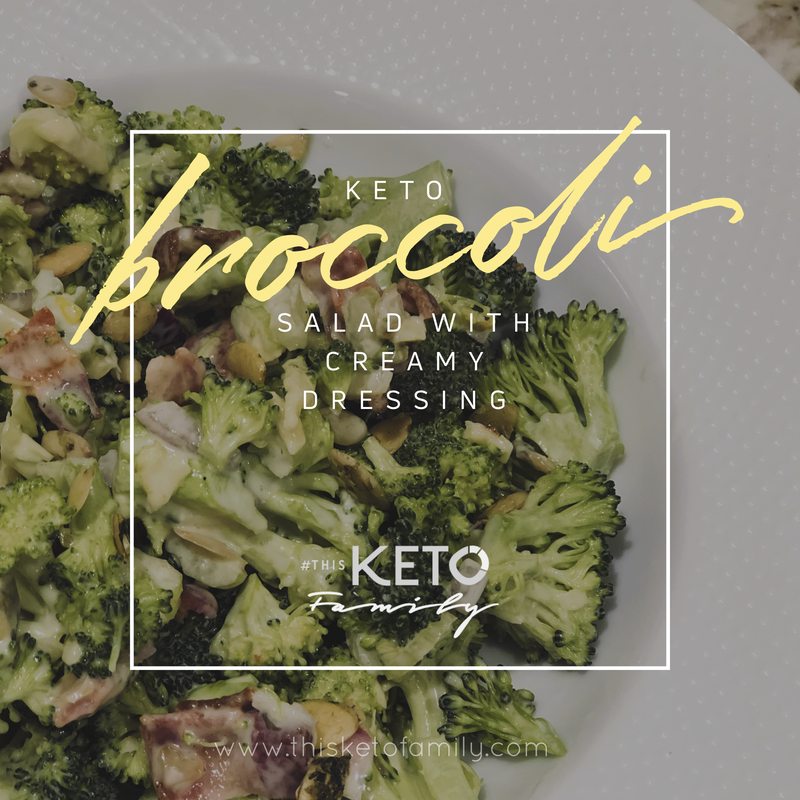 The weather is starting to get warmer and little league is creeping around the corner. For our family it means many meals out in the open air picnic style. For me this gets me to start thinking about portable, packable meals that are delicious and, of course, keto-friendly. I used to make this broccoli salad pre-Keto. I used sugar and honey and added dried cranberries or raisins to it. Sometimes I added apples for a bit of crunch. In true keto-me-challenge fashion, I decided to make a keto version that was equally as delicious and filling. It's an easy recipe that tastes even better as the ingredients sit and the flavors combine, perfect for a outdoor picnic or lunch on the go. (Note: I make a generous portion because I eat it for days – lunch, dinner, snack...haha) Ingredients: 4-5 cups of chopped broccoli florets 8-10 strips of cooked bacon, crumbled 3 stalks of celery, chopped 1/2 red onion, choppped 1/2 cup shredded cheddar cheese 1/2 cup sprouted pumpkin seeds Dressing Ingredients: 1 cup avocado mayo 1 tablespoon sour cream 1 tablespoon white wine vinegar 2 tablespoon Monkfruit sweetener pinch of salt Directions:
Follow us on Social Media | Did you try the recipe? Tag us! @thisketofamily This Keto Family is a participant of the Amazon affiliate marketing programs, which means we may get paid commissions on editorially chosen products purchased through our links to retailer sites.
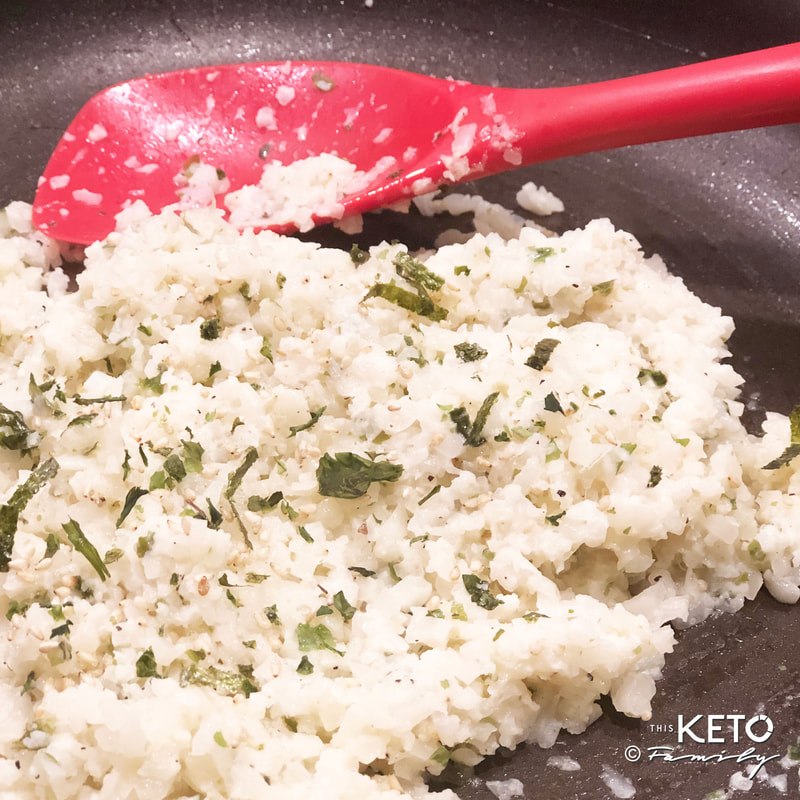
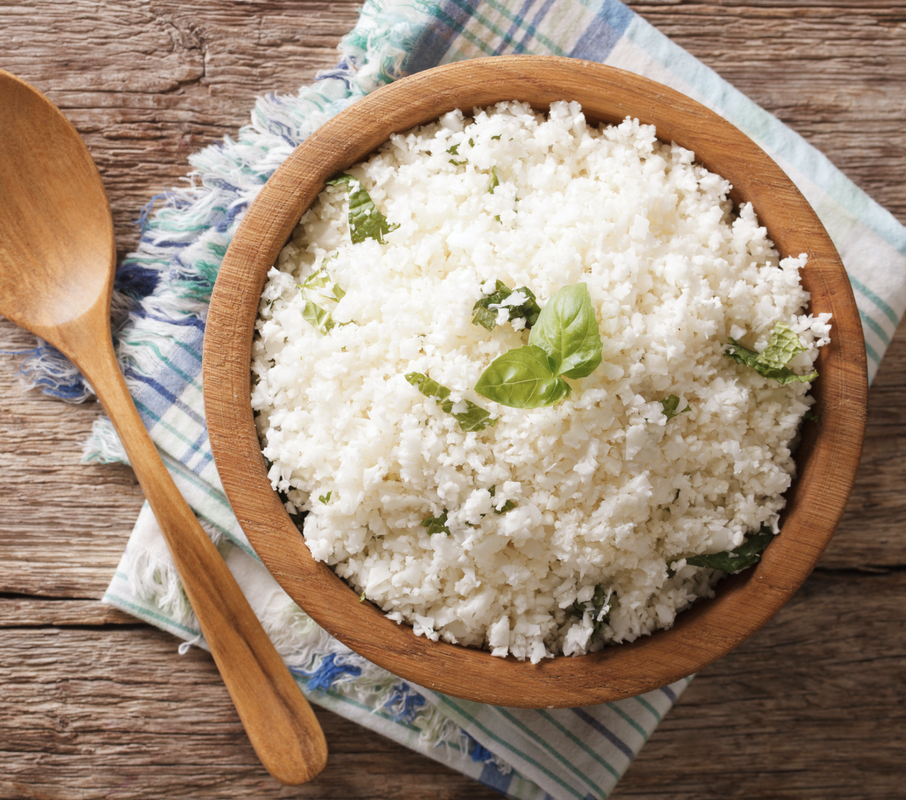 When you grow up in an Asian household like I did, rice is a staple at almost every meal. Growing up I used to eat white rice for breakfast, lunch and dinner. Even many Filipino desserts incorporate rice or sweet rice as cakes, sticky rice rolls and more. Surprisingly as I became more fat adapted I craved less and less rice. I would go to family parties, look at the rice and not even blink and eye. To me it was an easy thing to let go of. Cauliflower rice became a great alternative in our house. I won't lie—it does not even remotely taste like rice (LOL) but it is a neutral flavor (or it can soak up any flavor you cook it with) and its a nice grain alternative. If you're eating a dish that is traditionally eaten with rice, psychologically it seems more complete when there's caulirice associated with it. (Funny how our brains work). It has taken a long time for my children to accept it, but they all have slowly learned to embraced the dish. They also occasionally get a nice "real rice" treat (LOL) mostly when we're eating out or at a family party. We don't limit them and know that an occasional "wheat treat" is totally fine. Frozen cauliflower or grate your own? Ok, who has the time to grate their own cauliflower? I mean really LOL. I personally use the pre-grated, frozen kind. One it makes it super easy and two I think it helps cook the cauli pieces to the right doneness—soft with a little bite; similar to real rice. There's nothing worse than crunchy cauliflower rice. I add a little garlic powder to help enhance the flavor. An my other secret? Tallow. I've been cooking a lot lately with beef tallow and it adds another layer of flavor, almost a nutty, buttery flavor that can't be beat. This dish is super easy to make and it comes together in less than 10 minutes—no joke. Ingredients: 10 oz frozen riced cauliflower 1 tablespoon beef tallow (or Kerrygold butter) 1/2 teaspoon garlic powder salt and pepper to taste Directions:
Follow us on Social Media | Did you try the recipe? Tag us! @thisketofamily This Keto Family is a participant of the Amazon and other affiliate marketing programs, which means we may get paid commissions on editorially chosen products purchased through our links to retailer sites.
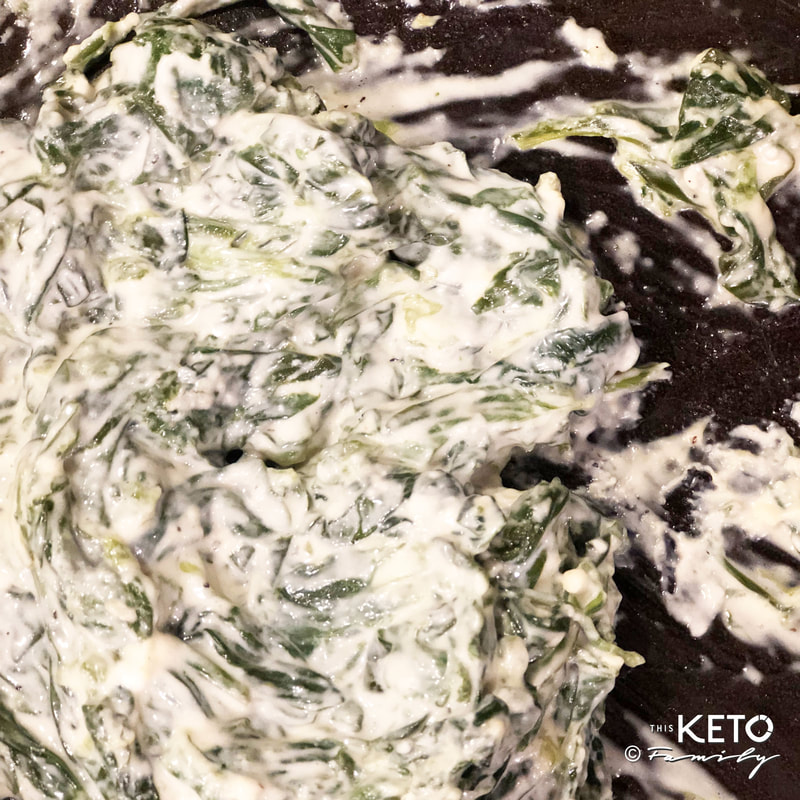 Side dishes make all the difference in any meal, at least that's what I think. There's nothing I look forward to than the veggies that adorn my plate. However, for my young ones, veggies aren't always the highlight, though certainly they've grown accustomed to them. If you are trying to get more fats in your diet or need a way to get your kids to eat their greens, what's better than serving them some creamed spinach? The best part about this recipe? I ALWAYS have all the ingredients in my fridge. So if there is ever a night that I need a side dish, I know this one is ready and can be whipped up in under 10 minutes! Also, this one is always a crowd pleaser in my house. Ingredients: 5 heaping cups fresh baby spinach 2 tablespoons grass fed butter 1/2 teaspoon garlic powder 1/2 teaspoon onion powder 1/2 cup heavy whipping cream 1/2 cup whole milk 1/4 cup sour cream 3-4 ounces of cream cheese 1/2 cup grate parmesan cheese (optional) 1 tablespoon mayonaise salt and pepper to taste Directions:
This Keto Family is a participant of the Amazon affiliate marketing programs, which means we may get paid commissions on editorially chosen products purchased through our links to retailer sites.
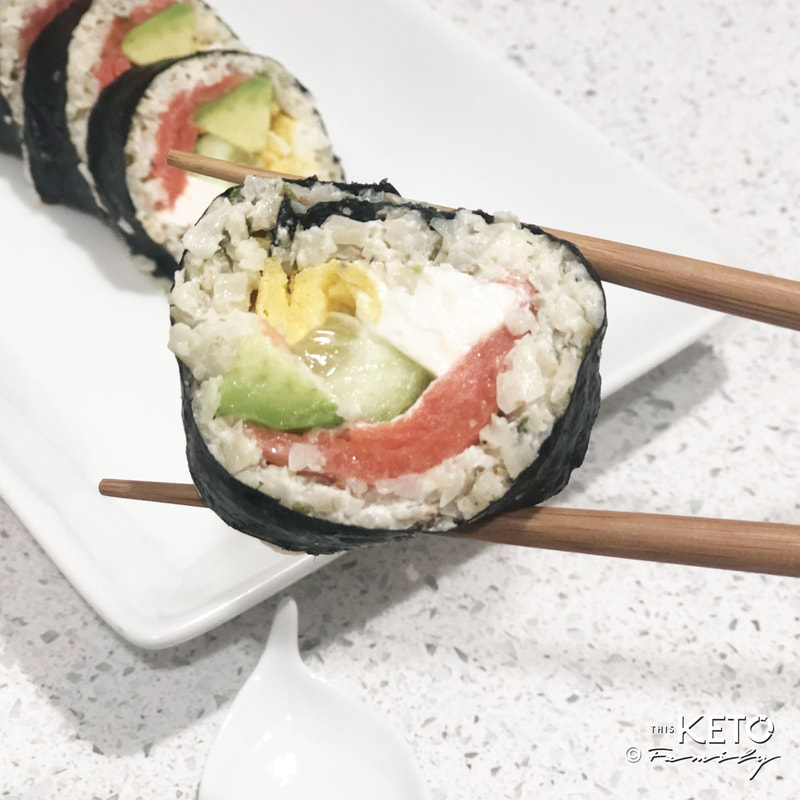
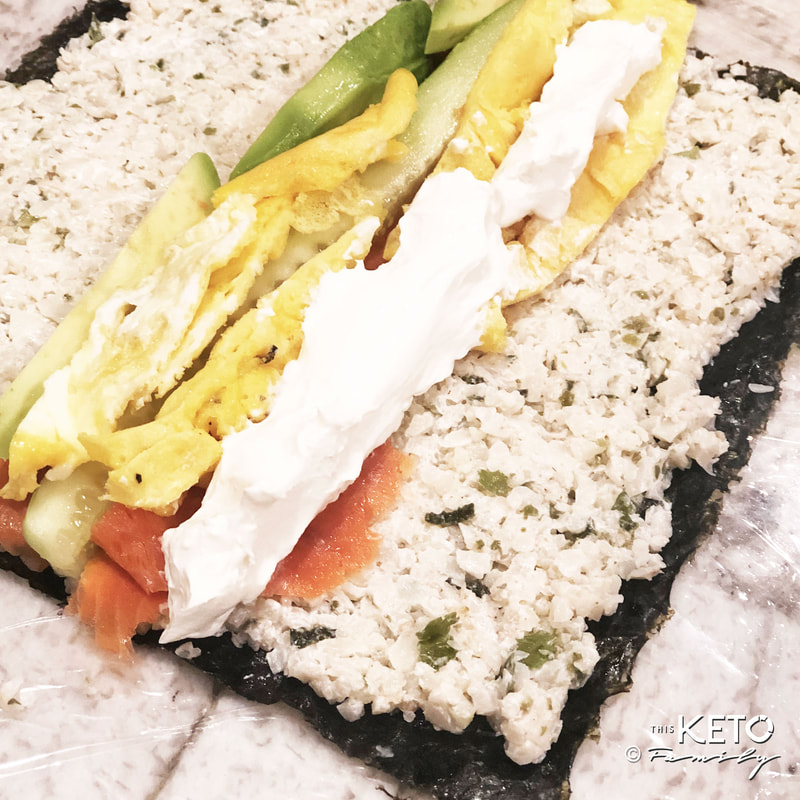
'I'm kinda surprised just how much this looks and tastes like sushi rice. If you're a sushi lover like myself you know that sushi rice is a bit sticky and has a hint of rice wine vinegar to it which adds a nice sweetness and tang.
This recipe uses riced cauliflower and is seasoned in such a way that it tastes just like the real thing. The trick to this is to cook your cauliflower on the stovetop for a few minutes. If you simply steam your cauliflower in the microwave, like most people, you'll have bits of hard-ish cauliflower which doesn't do a good job of convincing anyone. Traditional white rice is soft and sushi rice is a bit on the stickier side. So I used some gelatin (shhh thats the secret) and a bit of cream cheese (who doesn't love cream cheese) to hold the cauliflower together. Add you choice of fillers, roll em up and there you have it. Keto style sushi, that is low carb and won't fall apart when you pick it up with chopsticks (I know because I tried)!
Directions:
If you are going to add the gelatin, follow the first 2 steps. Otherwise skip to step 3.
That's it! Allow the rice to cool before adding it on top of your Nori wrapper sheets. If the mixture is too hot, the nori will rip when you try to roll it. Happy eating!
This Keto Family is a participant of the Amazon affiliate marketing programs, which means we may get paid commissions on editorially chosen products purchased through our links to retailer sites.
 Its easy to miss potatoes on a Keto diet. Though I'm still working on a "French fry" alternative, this mashed "potato" recipe will definitely satisfy your cravings. I love to serve this with keto meatloaf or roasted tri-tip and gravy—which is always a crowd pleaser at our house! Ingredients: 3 heads cauliflower, cut into florets 3-5 garlic cloves, peeled 4 tablespoons grassfed butter (I recommend Kerrygold) 2-3 tablespoons heavy whipping cream 4 oz cream cheese 2-3 tablespoons sour cream 1/8 teaspoon garlic powder salt and pepper to taste Appliances/Tools: **For BEST results** Handheld immersion blender (I use a similar one) Otherwise you can use a blender or food processor Directions Cake:
This Keto Family is a participant of the Amazon affiliate marketing programs, which means we may get paid commissions on editorially chosen products purchased through our links to retailer sites.
 I was really intent on making a traditional Keto Thanksgiving this year. And, well since I am the only semi-strict keto eater in my extended family, the tasks fell on my shoulders—but I took it on head first. I was convinced that I could "ketofy" just about any traditional item.
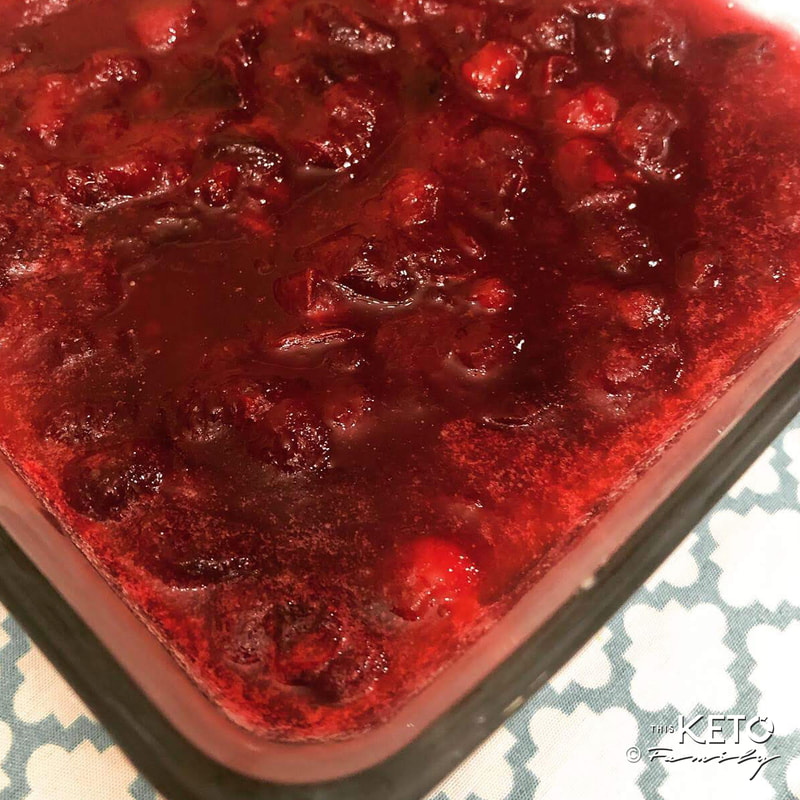
Although I'm not a big cranberry fan, I decided cranberry sauce qualified as a "tradtional Thanksgiving" item. So here we go! haha — Continue to check my posts and see all the Keto Thanksgiving recipes I've tagged and will continue to update here. Ingredients: 1 package fresh cranberries (I think about 10oz) 1 cup water 3/4 cup Swerve confectioner's sweetener 1 drop lemon essential oil* (I ONLY recommend ingesting this brand) or 1 tsp lemon zest 2 drops orange essential oil* (I ONLY recommend ingesting this brand) or 2 tsp orange zest 1/2 teaspoon xanthan gum (I recommend this one) a few drops coconut oil Directions:
You can totally make this item the day before your event. It holds up really well in the fridge. Just remove it a few hours before you're ready to serve it so that it has time to come to room temperature. *I do not recommend ingesting ANY essential oil brand. The only brand I suggest for use in cooking is Young Living due to its high and pure quality and FDA certified Vitality Line. If you need help ordering Young Living oils, please contact me or click here. 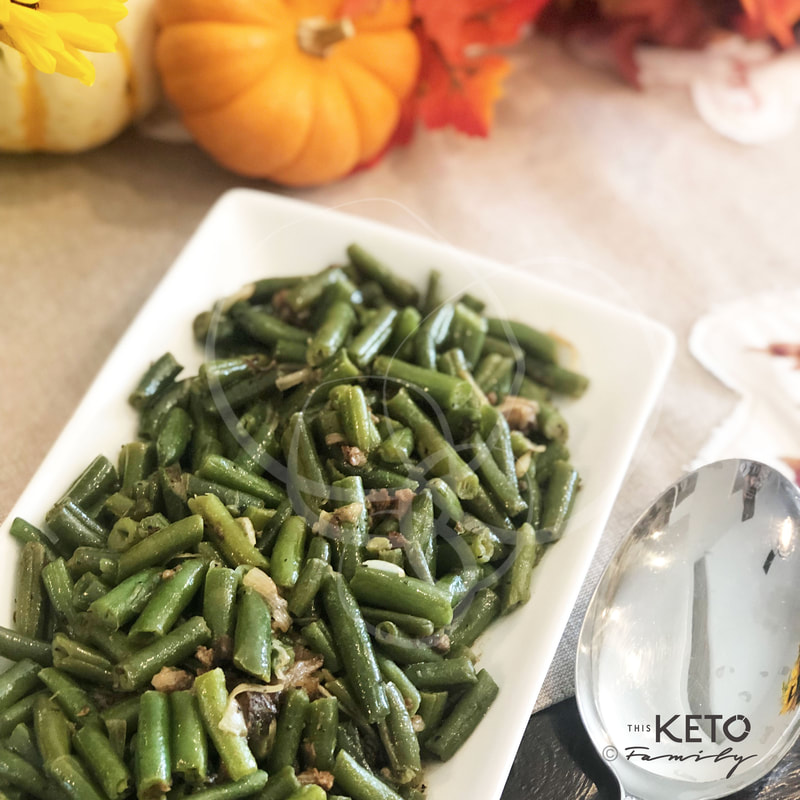 Whether you need a Thanksgiving side dish or a quick week night veggie option, these green beans are quick, easy and tasty — even the kids will like them. I always have frozen veggies in my freezer just in case I don't have any fresh veggies on hand. That's exactly what happened the other night when my grocery store haul turned out to be quickly depleted before the week's end. I needed something that I could get on the table quickly. Smother these with gravy and you have yourself a winner!
Ingredients: 1/4 onion, thinly sliced 3-4 strips bacon or prosciutto, diced 1 tablespoon avocado oil 2 tablespoon butter, divided 1/4 teaspoon garlic powder 1 package frozen green beans 1/4 cup beef bone broth (I recommend this one) salt and pepper to taste Directions:
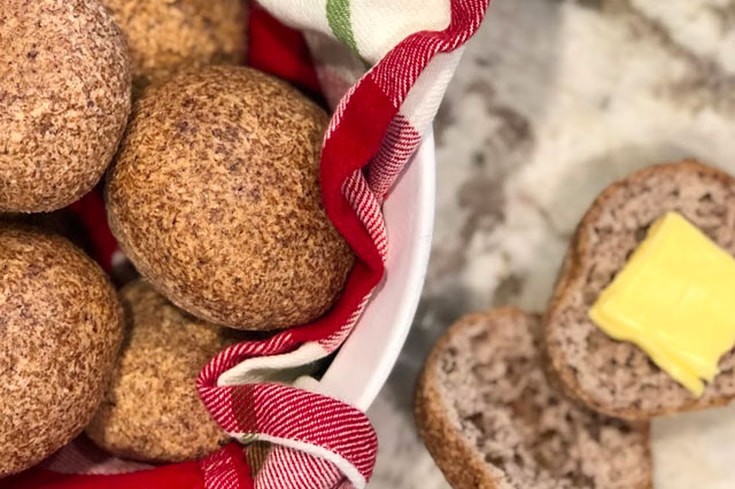 There are only a handful of things a keto parent yearns for – keto kid snacks, crackers and BREAD. The internet is full of recipes of 90-second keto breads that are a bit too eggy, fathead bread that isn't fluffy enough and coconut breads that are dense and not airy. When you have young kids who recall the proper textures and tastes of traditional bread, passing off a ketofied version is not at all successful.
Enter these keto dinner rolls. After trying several recipes online and tweaking a few components, here's a winner that is crunchy on the outside and soft and fluffy on the inside. My son even said, "This tastes like Panera bread mommy." Booya! #ketomomwin Ingredients: 1 cup (4 oz or 130g) almond flour (I recommend this one) 1/4 cup + 2 teaspoons (1.2 oz) coconut flour (I recommend this one) 4 tablespoons (20g) psyllium husk powder (I recommend this one) 2 1/2 teaspoons baking powder 1 teaspoon sea salt 2 teaspoons apple cider vinegar 2 tablespoons liquid egg whites (or 1 large egg whites) 1 tablespoons avocado oil (or olive oil) 1 cup boiling water Directions: Preheat the over for 350°. Whisk all the dry ingredients together a large bowl. Add the vinegar and egg whites to the bowl, then the boiling water. With a hand mixer, mix the ingredients together for about 30 seconds. (Do not over mix it or the bread will be hard.) Using a silicon spatula, scrape the sides and form the mixture into a ball. Let it stand for 2-3 minutes for the psyllium husk to start absorbing the liquid. Divide the dough into 8 sections. Place on a silicon lined baking tray and bake in the oven for 60 minutes (or until you hear a hollow sounds when you tap the bottom of the bread). The bread will rise and expand, though it will not spread width-wise. Your final keto dinner rolls should be about 3 inches in diameter. Serve them immediately with a healthy heap of Kerrygold butter! ~Enjoy! 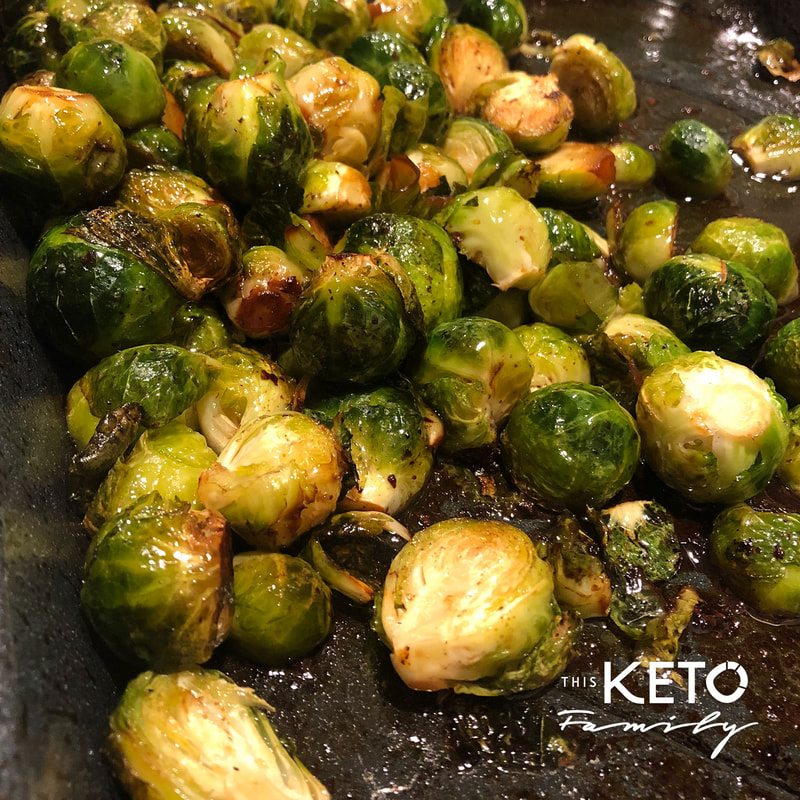 Side dishes. Some people are ok with having a salad with the same fixins at every meal and you know what? If you are new to keto and that is your jam, then don’t fix what ain’t broken. But if you’re more like me and you view variety as the spice of life, then hold on to your horses, because this keto mama has a whole bunch of keto food ideas LOL. My children used to call these the basketball veggies when they were younger. I can see it, small balls--basketballs. Honestly as long as they ate them, I didn’t really care. Over the years I cooked these the same way until recently I started adding some parmesan cheese to them. Bingo! You’ll love the semi-salty, crunchy outer coat and the softened middle. I find this side dish an easy one to pair with almost any main course. If you are ever tired of your side salad or having broccoli all the time, then swap it out one night with some oven roasted Keto parmesan brussels sprouts! Pairing: Chicken Cordon Bleu Serves: 4 Ingredients: 1 ½ pounds fresh brussel sprouts, halved 2 slices bacon, diced 1/4 cup parmesan cheese, grated 2 tablespoons panko pork crumbs Salt and pepper to taste Directions:
Never have boring side dishes again! Swap in brussel sprouts more often. With this recipe, even your children will love them! Follow us on Social Media | Did you try the recipe? Tag us! @thisketofamily This Keto Family is a participant of the Amazon and other affiliate marketing programs, which means we may get paid commissions on editorially chosen products purchased through our links to retailer sites.
|

AuthorHi! I'm Arlene – wife, mother of 3, entrepreneur and keto foodie. I love to make, share and try different, delicious keto food recipes that are easy to make and most-importantly kid-friendly. Life is hard as it is, feeding our families should be easy, fun and nutritious. Archives
December 2020
Categories
All
|

 RSS Feed
SERVICES |
Recipes |
About |
CONNECT with Us |
©2019-2022 THIS KETO FAMILY ALL RIGHTS RESERVED. | PRIVACY POLICY & DISCLOSURES | CLIENT LOGIN