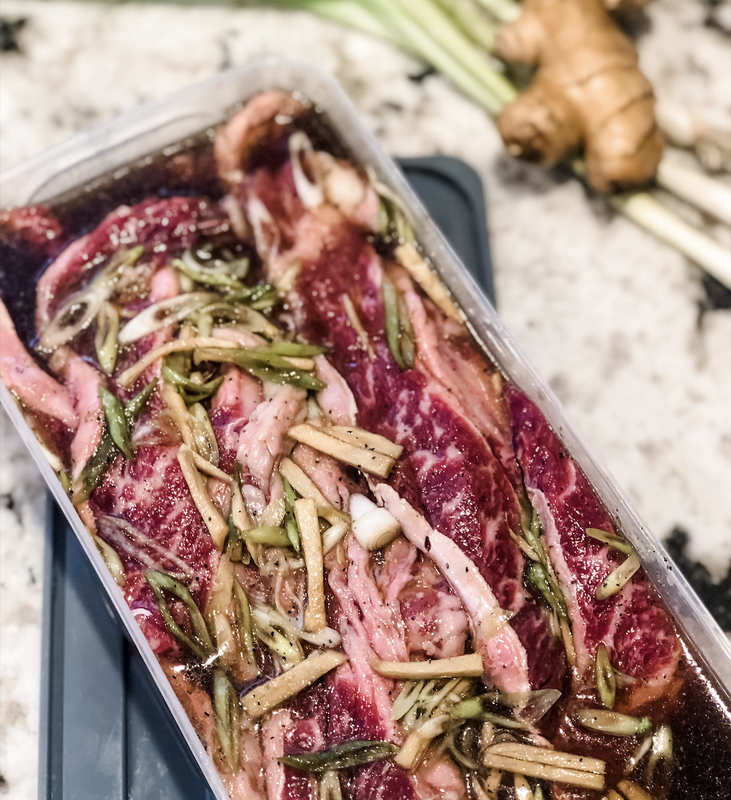
Ingredients (Marinade): 5 pounds Korean style beef short ribs 1/2 cup liquid aminos 1/2 cup water 2 tablespoon brown Swerve 1 tablespoon Yacon syrup 1 tablespoon avocado oil 2 tablespoon rice wine vinegar 2 stalks green onions sliced 2 inch piece ginger, sliced 1 teaspoon black pepper Directions:
Follow us on Social Media | Did you try the recipe? Tag us! @thisketofamily This Keto Family is a participant of the Amazon and other affiliate marketing programs, which means we may get paid commissions on editorially chosen products purchased through our links to retailer sites.
0 Comments
Did someone say ice cream? We are an ice cream family. Before our keto transformation we used to eat ice cream practically daily for dessert. Looking back, we so didn't need those extra carbs and sugars right before bed. But that got us here today and helps guide my decisions at this season of our lives.
Keto ice cream is one of those desserts that seem like it could easily be a guilty pleasure, but on keto it's quite frankly a mainstay. Plus if your ice cream is made with organic, grass fed heavy whipping cream and other quality ingredients, then bring the ice cream sundae bar on over as I check all the boxes off my macros. This is exactly the reason why the thought of making my own ice cream appealed to me so much. As I've gotten deeper into my ketogenic journey I'm realizing more and more that the core concepts about quality ingredients are just as important, if not more so, than simply counting net carbs. Yes, you read that right. Net carbs in keto is one part of a greater picture of wellness. Macro ratios are also important. In therapeutic ketosis dietitians strive to hit a near perfct macro ratio at every meal. And guess what? This ice cream recipe does just that. The macro ratios are just perfect with this recipe (77-18-5) which helps justifies having a bowl after dinner even more! Also most of the keto ice creams out there have started giving me GI discomfort because of their specific blend of sweetener. Others just aren't organic—both things that are important to me.
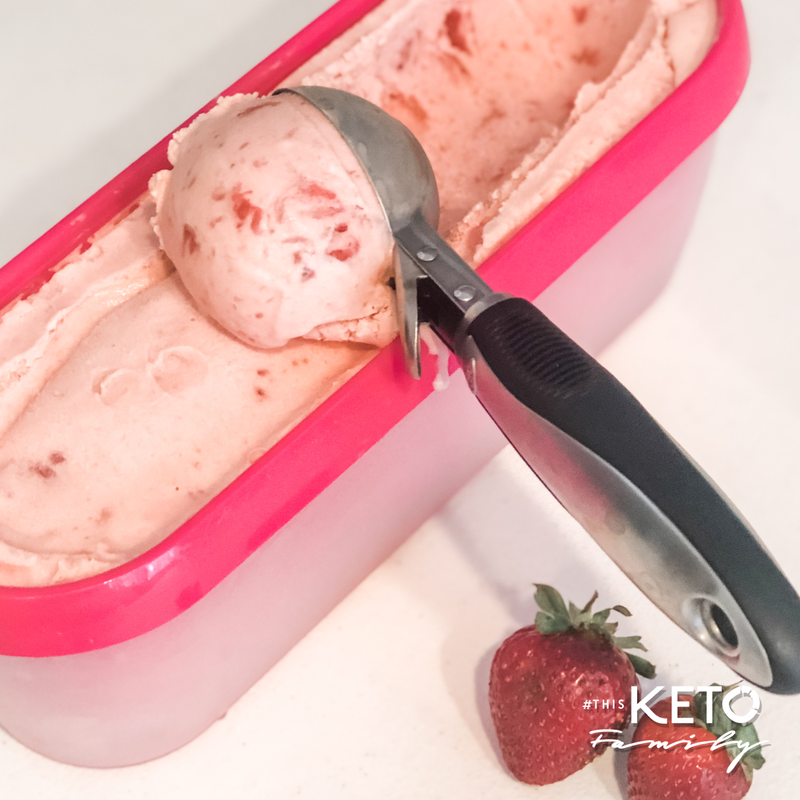
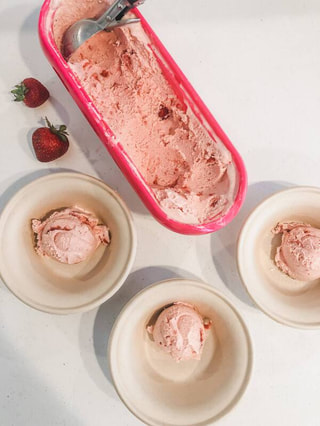
So there began our summer goal to make vanilla ice cream. Vanilla ice cream quickly turned into a list of 10 flavors I was set to make as my kids quickly rattled off many favorite flavors. My brother in law also makes ice cream, but never strawberry. And with a strawberry-loving daughter, a huge backyard garden yield and an equally strawberry-loving husband, the challenge was accepted to make keto strawberry ice cream.
The custard base is the same on all my ice creams. What I like about it is that it is EASY. I mean come on now who has time to temper the eggs? (Hint: I looked this up and apparently tempering your eggs for homemade ice cream is an urban legend LOL. That was enough for me and allowed me to simplify a step—done!) Blending some of the strawberries and leaving some chunky gives you that authentic strawberry ice cream look with the specs and pieces of strawberries in your ice cream. YUM!
Ingredients:
4 cups heavy whipping cream 3 eggs 3/4 cup Allulose sweetener (You can use Xylitol but it gives me IG discomfort, so I prefer Allulose) 2 tbsp whey protein, unflavored (optional) 1 tbsp vanilla extract 1/8 tsp salt 3 cups fresh strawberries, roughly chopped 1 tbsp lemon juice 1/4 cup Allulose sweetener Directions:
USE OUR FAVORITE BRANDS + PRODUCTS
Follow us on Social Media | Did you try the recipe? Tag us! @thisketofamily
This Keto Family is a participant of the Amazon and other affiliate marketing programs, which means we may get paid commissions on editorially chosen products purchased through our links to retailer sites.
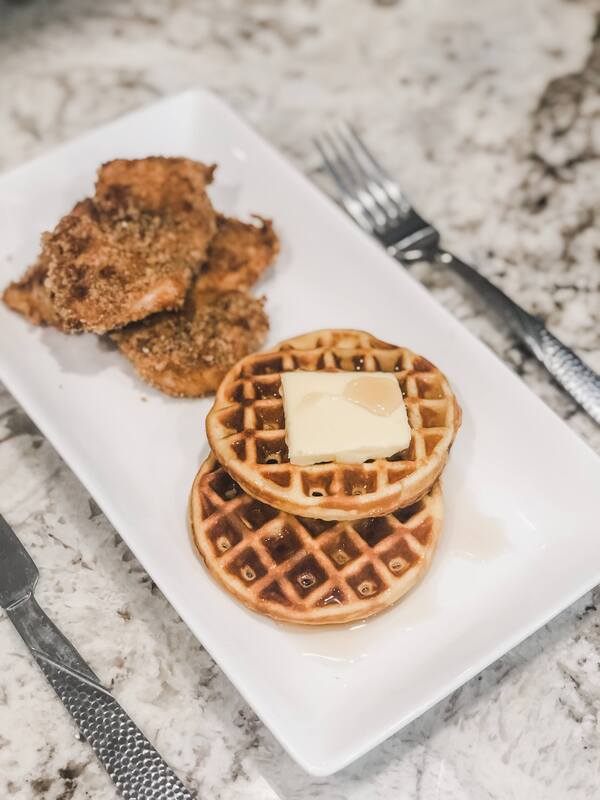
Chicken and waffles was a meal I ordered once in a blue moon because it always felt gluttonous and unhealthy. A "normal" standard American Diet version of this meal easily boasts 306 grams of carbohydrates and upwards of 123 grams of sugar; not even counting the sugar and carbs from any syrup you'd slather on top--YIKES!! (These nutrition facts I pulled from a popular restaurant's chicken and waffle menu version, eek!)
My keto version is about 6 grams of net carbs for an ENTIRE SERVING (2 pieces of chicken and 2 waffles PLUS keto maple syrup!) I no longer feel guilty eating this meal and neither should you. It's also become a favorite in my household with my kids. I also opted to use my Cosori air fryer to cut out any further polyunsaturated fats that would have been used if I deep fried the chicken. More on polyunsaturated fats and MegaTrans fats in a separate blog post. For now, know that the air fryer option still produces a crispy crust while keeping the inside moist and flavorful. Bon appetite! Ingredients: 2-3 pounds skinless chicken thighs 3 cups pork pankos (pork rind "bread" crumbs) 1 cup shredded parmesan 1 cup almond flour 3 eggs, beaten 1 teaspoon Pink Himalayan sea salt 1 teaspoon garlic powder 1/2 teaspoon paprika 1/2 teaspoon onion powder 1/2 teaspoon pepper Waffle Recipe Directions:
Make it with our current product favs
Follow us on Social Media | Did you try the recipe? Tag us! @thisketofamily
This Keto Family is a participant of the Amazon and other affiliate marketing programs, which means we may get paid commissions on editorially chosen products purchased through our links to retailer sites.
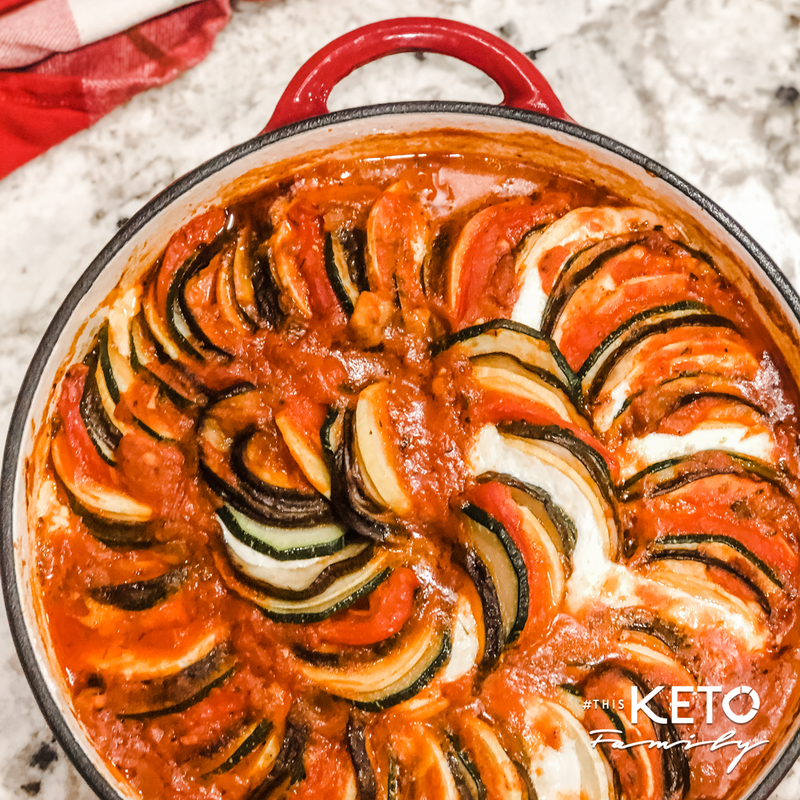
Several months ago when our vegetable garden was producing at its peak, I had zucchini and yellow squash quite literally coming out of my ears. My family quickly got tired of sautéed squash at every meal. I even purchased a spiralizer so that I could dress up the same vegetable in a different way (and trick the babes into eating it yet again ha!)
On night I asked my keto community for ideas and someone suggested ratatouille. I knew what it was but I honestly thought it would be so hard and complicated that I never endeavored to do it. Wow, was I wrong! The hardest part is cutting the veggies, but with the correct tools, it was a snap. I dug out my mandoline (that I received as a present and never used) and got to work. Slicing done in less than 5 minutes. Layering the veggies, 10 minutes (maybe). Baking the ratatouille was 30 minutes. The result? A visually stunning dinner that also tastes amazing, quite literally like it came from an expensive Italian restaurant! Another plus...Leftovers! This tastes even better the next day or repurposed as a soup! I hope you enjoy this recipe as much as we do. Serves: 6-8 Ingredients: 2 large zucchini, sliced thinly 1/16 inch thick (~1 mm) 2 large yellow squash, sliced thinly 1/16 inch thick (~1 mm) 2 large eggplants, sliced thinly 1/16 inch thick (~1 mm) 1 package fresh mozzarella cheese log 1 jar roasted red bell pepper, cut into strips 1 jar Rao’s Marinara sauce (24 oz) 1/2 cup parmesan cheese, grated, divided 3 tablespoons olive oil 1/2 teaspoons garlic powder 1 teaspoon Worcestershire sauce Salt and pepper to taste Basil for garnish Directions:
Make it with our current product favs
Follow us on Social Media | Did you try the recipe? Tag us! @thisketofamily
This Keto Family is a participant of the Amazon and other affiliate marketing programs, which means we may get paid commissions on editorially chosen products purchased through our links to retailer sites.
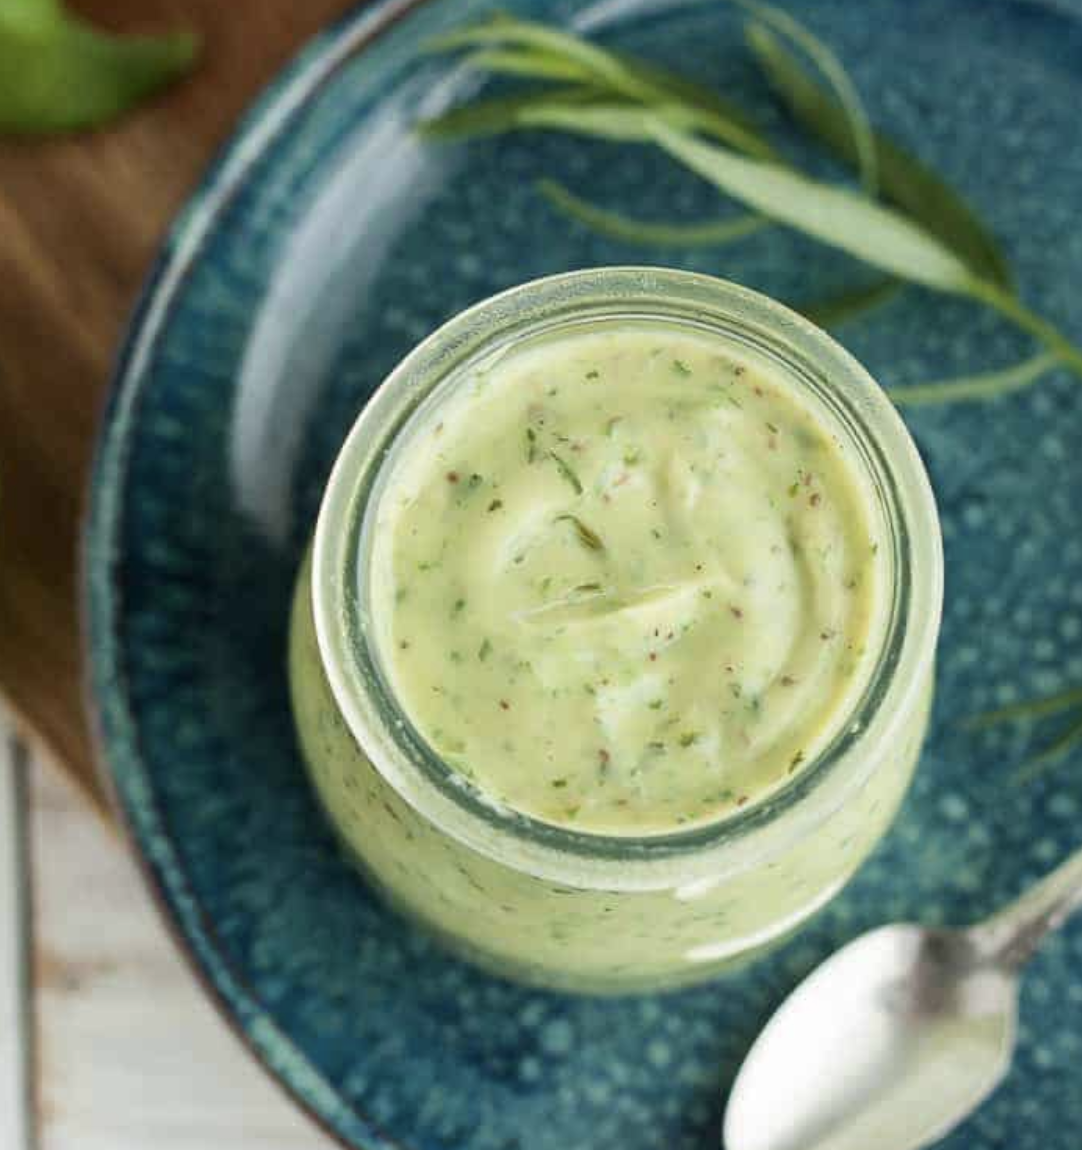
What better way to enjoy a salad than to make your own salad dressing. So many dressings on the market are full of pro-inflammatory causing ingredients like vegetable oils, fillers and preservatives that are mean to extend the shelf life of a product. But in doing so these ingredients cause inflammation in our bodies wreaking havoc on our metabolic pathways and eventually causing imbalance, malfunction and disease.
I don't often make salad dressings but when I do a certain contentment arises with the thought that I am able to control the ingredients I use and uphold the quality I hold in such high regard. Don't get scared by salad dressings. They are actually quite easy and fun to make. Avocado ranch is a perfect way to increase your healthy fat consumption. Make this ahead of time and keep a jar in the fridge and you'll be all set for any salad moment. Tools: Food processor Empty salad dressing squeeze bottle (for storage) Ingredients: 1 cup avocado mayo (we love Sir Kensington's brand) 1 cup unsweetened Greek yogurt (we like Maple Hill brand or Straus Brand) 2 tablespoons sour cream 1/2 large avocado 1 tablespoon cilantro 1/2 teaspoon dried dill 1/2 teaspoon dried garlic powder 1/2 teaspoon dried minced onion 1/2 teaspoon apple cider vinegar salt and pepper to taste Directions:
Make it with our current product favs
Follow us on Social Media | Did you try the recipe? Tag us! @thisketofamily
This Keto Family is a participant of the Amazon and other affiliate marketing programs, which means we may get paid commissions on editorially chosen products purchased through our links to retailer sites.
|

AuthorHi! I'm Arlene – wife, mother of 3, entrepreneur and keto foodie. I love to make, share and try different, delicious keto food recipes that are easy to make and most-importantly kid-friendly. Life is hard as it is, feeding our families should be easy, fun and nutritious. Archives
December 2020
Categories
All
|
 RSS Feed
SERVICES |
Recipes |
About |
CONNECT with Us |
©2019-2022 THIS KETO FAMILY ALL RIGHTS RESERVED. | PRIVACY POLICY & DISCLOSURES | CLIENT LOGIN