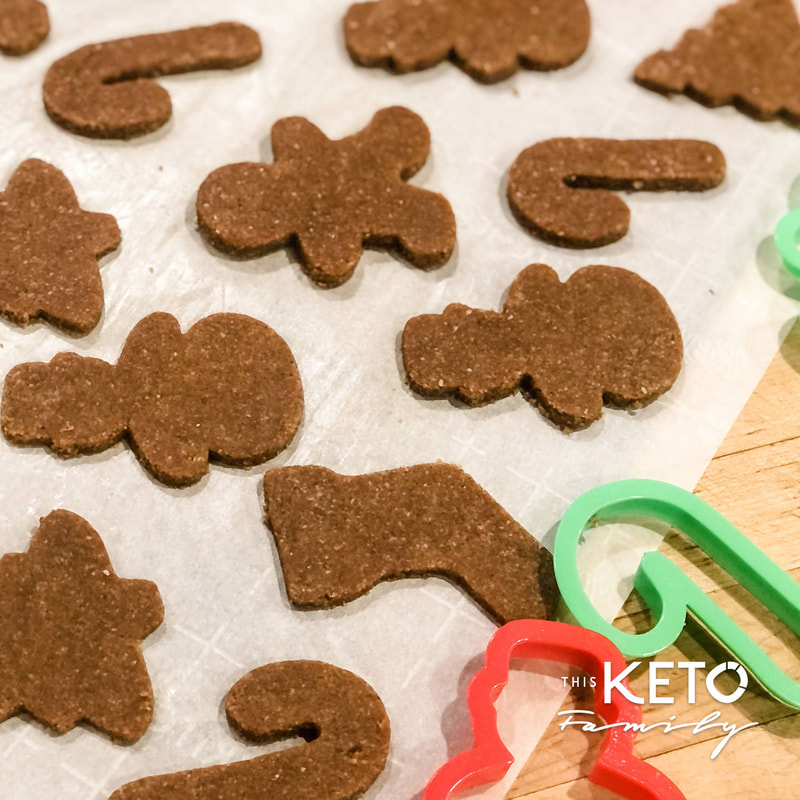
 Gingerbread cookies. The epitome of Christmas. Funny thing is I never ate or decorated gingerbread cookies when I was young, but my kids asked for them last year so I set off on a mission to make a keto-friendly gingerbread recipe. Personally I like gingerbread cookies that are crunchy with a nice balance of sweet and spicy. I'm not a huge fan of overly sweet or overly spicy versions. If you're looking for a lightly sweet, crunchy keto gingerbread cookie recipe, then this one is for you. Crunch There are couple secrets to crunchy cookies when baking keto. Believe it or not the type of sweetener you use contributes to the final texture of the piece. It not only has a different sweetness profile (so be careful when substituting sweeteners when they are listed on a keto recipe. They can be listed because of their end property or sweetness level. Always use the sweetener lists to get the closest results. I know, there are A LOT of different keto sweeteners, but trust me, choosing the right one can be the difference between chewy or crunchy, sickly sweet or the perfect sweetness.) For this recipe I use Monkfruit sweetener a combination of the classic version and just a tablespoon of the Gold version. Why? Monkfruit crystalizes after it is warmed so the result is an extra level of crunch that you wouldn't get otherwise from a different sweetener. Also, Monkfruit is on the milder side of sweet so if you use something else, I would gut your sweetener down a bit. The Monkfruit Gold version is much sweeter so 1 tablespoon is sufficient. Lastly a tablespoon of psyllium husk brings all the ingredients together and allows it to firm up and hold the best. I hope you enjoy this recipe. Look out for my icing recipe to be posted soon! Yield: Recipe makes 12-15 cookies Ingredients: 2 cup almond flour 1 tablespoon coconut flour 1 tablespoon psyllium husk 1/4 teaspoon salt 1 1/2 teaspoons baking powder 2 teaspoons group ginger 2 teaspoons ground cinnamon 1/4 teaspoon ground clove 4 tablespoons butter, softened 1 egg, beaten 1/4 cup sweetener (I like Monkfruit for this) 1 tablespoon sweetener, gold (I like Monkfruit for this) 1 tablespoon black strap molasses Directions:
Net Carbs: 2.68g Net Carbs per cookie Net carb calculations are approximate and depend greatly on the brands and ingredients used. Net carbs are provided to provide a ballpark calculation. Use a carb calculator app to find your exact net carb count. Follow us on Social Media | Did you try the recipe? Tag us! @thisketofamily This Keto Family is a participant of the Amazon and other affiliate marketing programs, which means we may get paid commissions on editorially chosen products purchased through our links to retailer sites.
0 Comments
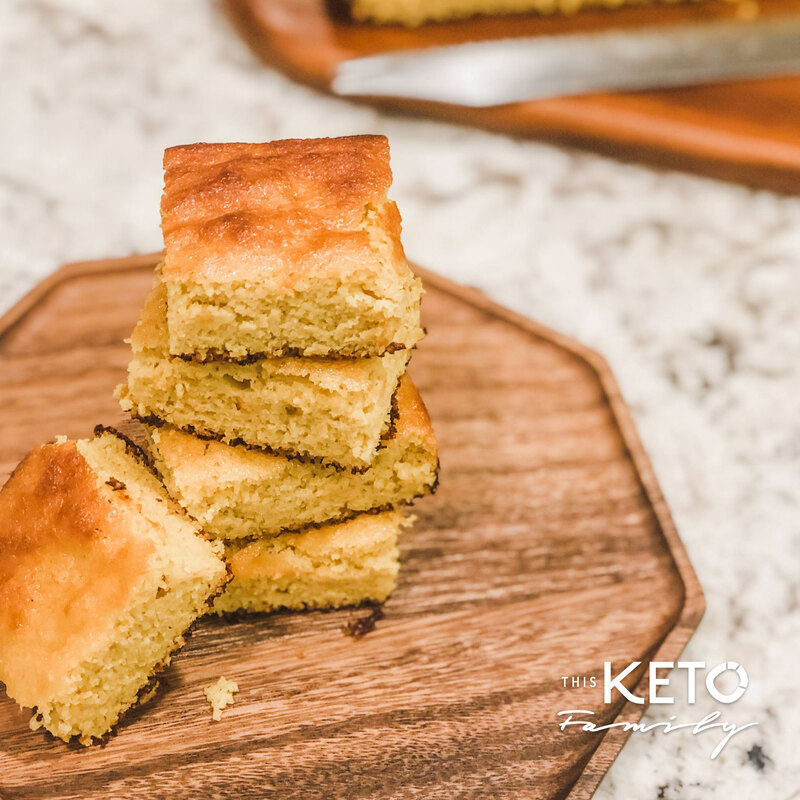
When fall rolls along and the colder weather begins, chili starts making its entrance into our weekly food menu. What goes better with chili than cornbread? When going keto, you can no longer make this food item from that little blue carton since corn is off the table. But how can we get a yummy, sweet bread to eat with our chili.
Enter this easy, mock cornbread recipe that I worked to perfect for several months. The way to get the fluffy airy bread texture is to use yeast, yup. If you’ve ever used yeast before it can appear daunting, but I assure you that its sooo easy once you have one or two yeast recipes under your belt. Yeast and Sugar You will need to activate your yeast with sugar. Yes sugar. It doesn’t work with any keto sweeteners like Swerve or allulose. It DOES however slightly work with Yacon Syrup but your bread will have a slightly different flavor in the end, not bad, but just different. So back to the sugar. Yes, you will need to use 2 teaspoons of white sugar. Don’t worry because the yeast will consume the sugar and release gas once it “proofs” or activates. This gas is what gives the bread its rise and the delicious air bubbles within the dough. Trust me when I say you can't really replace this, the final product won't really be the same. Serves: 16 Ingredients: 1 1/3 cups lukewarm water (about 100º F) 2-3 teaspoons sugar 2 ¼ teaspoon Instant Yeast 1 cup almond flour ¾ cup whey protein isolate 3 tablespoons coconut flour 2 tablespoons coconut oil ½ teaspoon Xanthan gum ½ teaspoon salt 1 ½ teaspoon baking powder ½ cup Allulose ½ teaspoon turmeric powder 1 tablespoon Yacon Syrup Honey Butter Ingredients: 4 tablespoons butter, softened 1 tablespoon Yacon syrup Directions:
Net Carbs: 1.75g per serving (1 slice) Net carb calculations are approximate and depend greatly on the brands and ingredients used. Net carbs are provided to provide a ballpark calculation. Use a carb calculator app to find your exact net carb count.
Make it with our current product favs
Follow us on Social Media | Did you try the recipe? Tag us! @thisketofamily
This Keto Family is a participant of the Amazon and other affiliate marketing programs, which means we may get paid commissions on editorially chosen products purchased through our links to retailer sites.
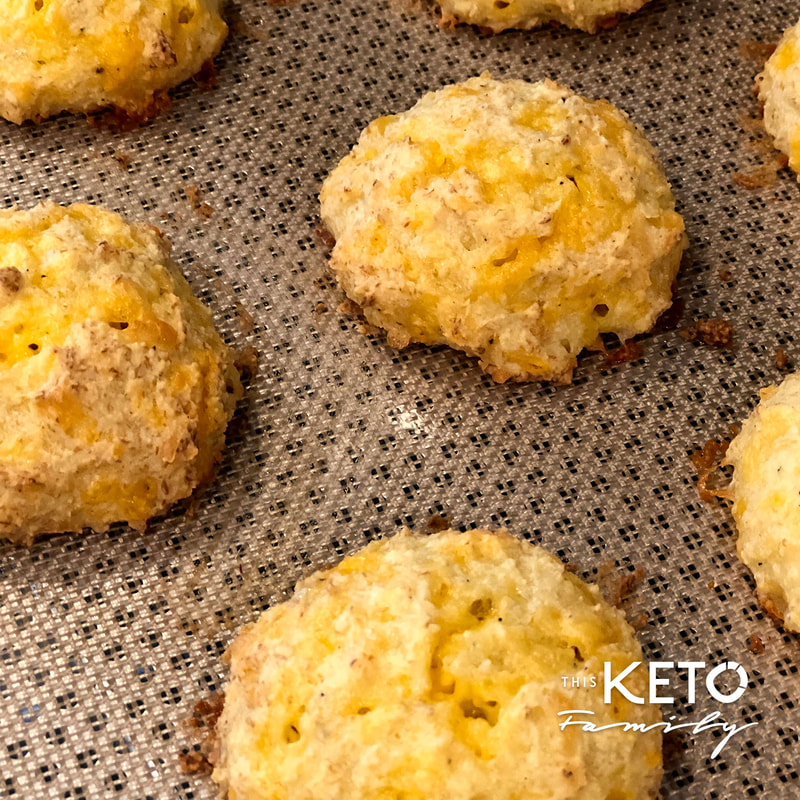 Who else loves those Red Lobster cheddar bay biscuits? I have both hands raised haha. Those fluffy, cheesy biscuits were the best, so here's my very close Keto version that will make your heart happy (no pun intended). According to the Red Lobster website, one of their biscuits is a whopping 16 grams of net carbs--eek! How many did I eat last time I was there so many years ago?? Not to worry— My copycat version is about 2.2g each!! The Flours Two great characteristics about the Red Lobster version is its fluffiness and cheesiness. My copy cat version uses a secret ingredient that help amplify both of those qualities in this keto remake. I like to use a combination flour blend of almond flour and whey protein isolate. If you've been cooking keto for a while you know that without much fats almond flour is dry and gritty. The addition of the why powder, in my opinion, helps bind the almond flour better improving the texture of the final product. Also, whey protein helps amplify the cheesiness of this recipe and enhances the buttery flavor—all great positives in my opinion. LOL The Cheeses The original cheddar bay biscuits used only cheddar. I like a combination of 2 cheeses for an enhanced flavor profile. But in a pinch and if you hate buying many different cheeses, then feel free to stick to all cheddar. Serves: 4-6 People Ingredients: 3/4 cup almond flour 1/4 cup whey protein isolate, unflavored 1/4 teaspoon baking powder 1/4 teaspoon baking soda 1 cup sharp cheddar cheese, shredded 1 cup gouda cheese, shredded (or double the cheddar) 4 eggs, beaten 2 tablespoons Kerrygold butter, melted 1/2 teaspoon garlic power 1/2 teaspoon dried parsley Directions:
These are best served immediately out of the oven. They can also be stored in a ziplock bag and then left overs warmed up for 10 seconds in the microwave. Follow us on Social Media | Did you try the recipe? Tag us! @thisketofamily This Keto Family is a participant of the Amazon and other affiliate marketing programs, which means we may get paid commissions on editorially chosen products purchased through our links to retailer sites.
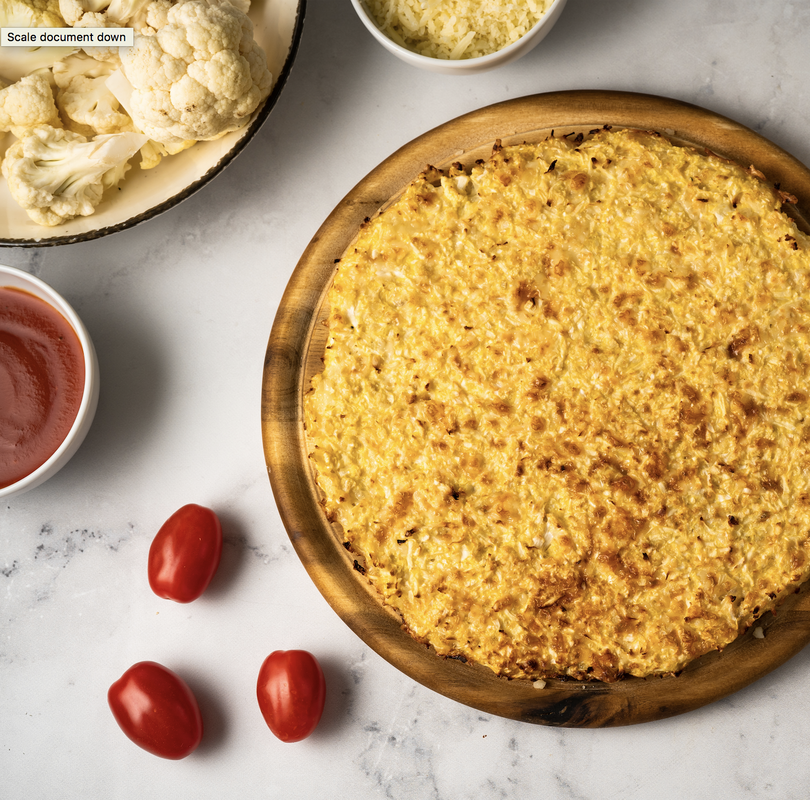 There are so many cauliflower pizza crusts on the mark now that are not truly keto-friendly. Yes, most are gluten free and grain-free, but they are contain starches and carbohydrates that would classify them technically non-keto. But don't fret my keto lovers, make this EASY and simple, PURE CAULIFLOWER pizza crust with cauliflower, mozzarella and parmesan cheese, a few spices and bam—a truly grain-free, whole30, gluten free and KETO caulicrust you can enjoy whenever you want. And if you use pre-riced cauliflower (like I do), then the hardest part is already done for you. Just sauce, top and bake. Pizza nights are saved! Ingredients: 1 package of frozen riced cauliflower (trader Joes or Costco has this), about 10-12 oz 2 tbsp Psyllium Husk Powder 1/2 cup shredded mozzarella 1/4 cup parmesan cheese 2 eggs, beaten 1/4 teaspoon Oregano 1/4 teaspoon Italian Seasoning 1/4 teaspoon garlic powder pinch of salt Directions:
Follow us on Social Media | Did you try the recipe? Tag us! @thisketofamily This Keto Family is a participant of the Amazon and other affiliate marketing programs, which means we may get paid commissions on editorially chosen products purchased through our links to retailer sites.
For my daughter's birthday I wanted to give her a special day filled with yummy treats, desserts and foods she loves. After-all what birthday party (especially a kid one) is complete without massive amounts of sugar, candy and sweet treats, right? It is something of a cultural thing really. When you go to a party or an event, all diets are "on-pause" or those days instantly become a "cheat day" (you know what I'm saying.) And if you knew me before my keto journey, you knew that a "dessert bar" was a very common, if not a standard thing, at our parties.
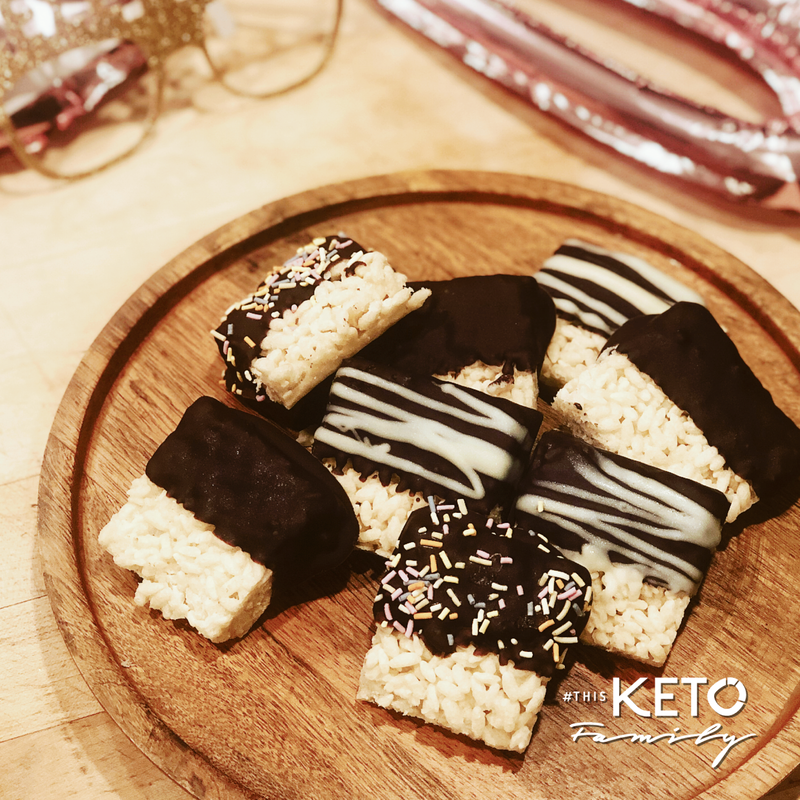
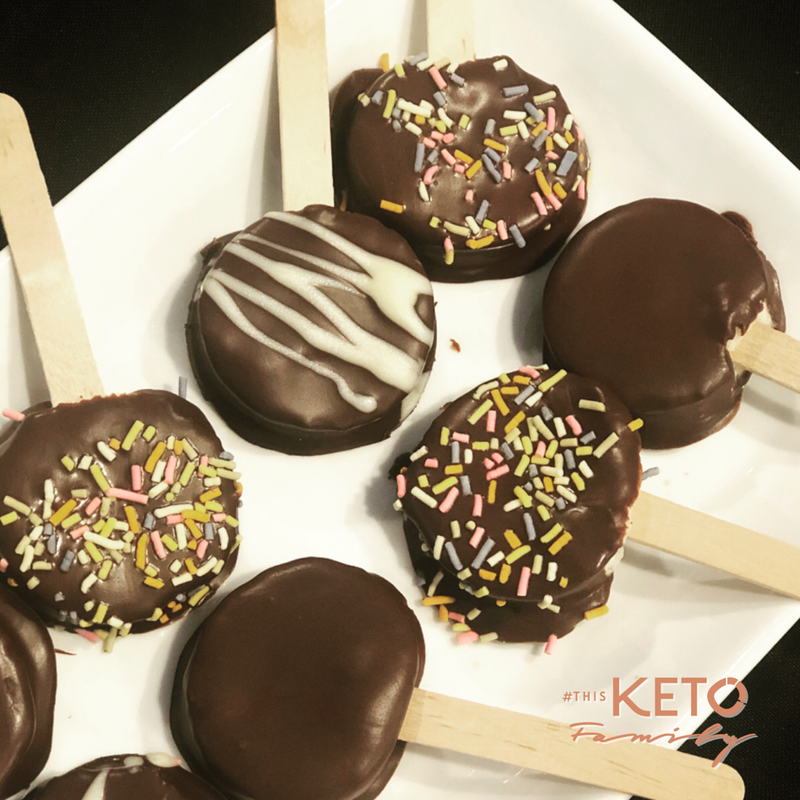
However this now sugar-free mama has a loud, convincing voice inside yelling, "There must to be a way to achieve this without bringing back the processed food crap we painstakingly worked so hard to get out of our house." If it was possible, I wanted to do it. So thus began my journey to think up foods that I could do a keto remake of. I loved rice krispies as a child and love how now they are so artisan looking half dipped in chocolate and swirled with white chocolate or sprinkles. This seems like a good keto remake candidate. Now that the market is slightly saturated with keto cereal companies that are basically using protein powders and alternative sweeteners, there are many options to choose form that are low carb and tasty. These cereals are crunchy and quite convincing, living up to my 80's childhood standards of cereal. The Highkey brand recently launched a cereal line to add to their product repertoire. Their new "frosted" flavor is also in the shape of a rice krispie. Enter inspiration! It would be perfect and look like the real deal! Ingredients: 1/2 batch keto marshmallows (Click here for our recipe) 1 box Highkey brand frosted cereal (Or other keto cereal flavors you like) 2 tablespoons grass-fed butter** Sugar free sprinkles (optional) Directions: **If you've already made your marshmallows, then follow the steps below:
**If need to make marshmallows first, then follow the steps in our recipe for Sugar-Free, Keto Marshmallows here.
TIPS
USE OUR FAVORITE BRANDS + PRODUCTS
Follow us on Social Media | Did you try the recipe? Tag us! @thisketofamily
This Keto Family is a participant of the Amazon and other affiliate marketing programs, which means we may get paid commissions on editorially chosen products purchased through our links to retailer sites.
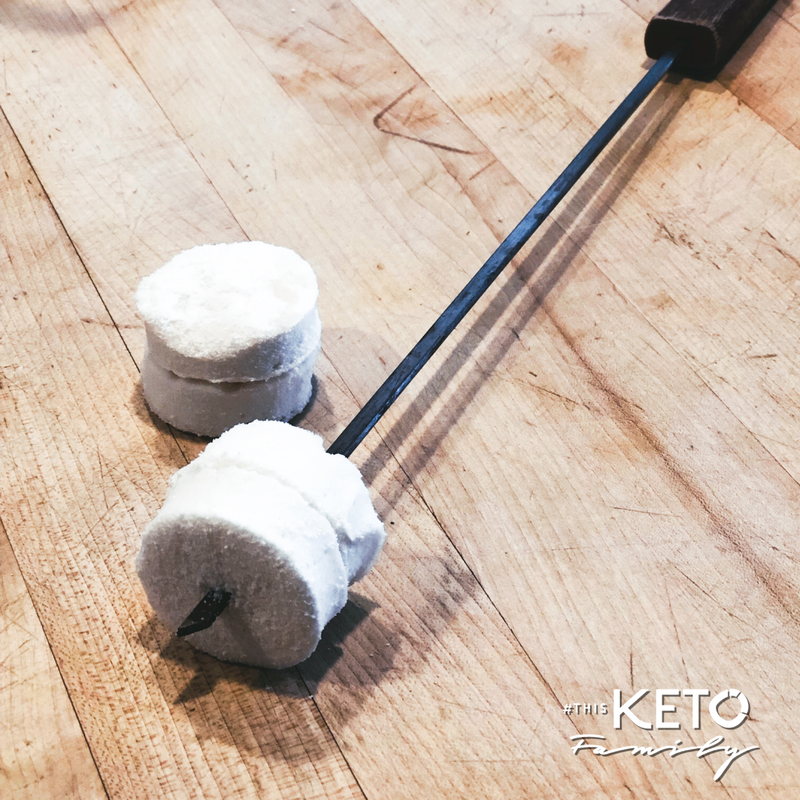
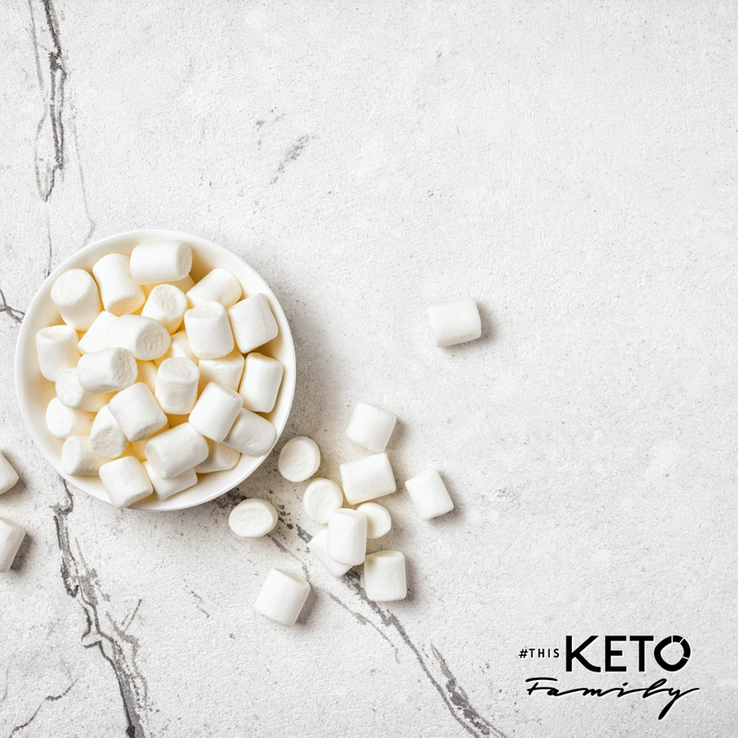 Marshmallows. When summer rolls around our house my kids are begging to go outdoors and camping. And naturally with every camping trip comes the necessity of s'mores!! Since my kids transitioned to keto, I've made it my mission of carefully replace their sugary treats with delicious-tasting keto alternatives. My goal was not to dupe them, but more to educate them about real ingredients as well as show them that "good" ingredients can also taste great! This simple marshmallow recipe brought this fluffy dessert/treat back into our lives, but alas, its roasting ability–particularly over an open fire is non-existent. If you try to roast these, the marshmallow will simple melt. I'm still working on a blend that can withstand a campfire and will brown and caramelize like a traditional marshmallow. If you cut these into small squares you can successfully add them to hot chocolate and they will melt as expected, so thats good! But they are too delicate to stand up against camp fires. However this keto version does get an "A" for its taste and texture—key for such an iconic food item. The key to achieving the correct texture in this recipe is to pump enough air into the gelatin. This will create the air pockets in the batter and therefore the spongy/pillowy bounce we're familiar with. The best way to do this? Using a stand-mixer. You can use a hand mixer, however the power is definitely a bit more concentrated – which adds more agitation to the batter. Though agitation causes air to get in the batter, too much will actually create density – so be careful. The better alternative to a stand mixer is just to mix the mixture by hand. But be warned that you will likely be mixing for a good 10-12 minutes so prepare for an arm workout. After you've made your marshmallows, you can eat them as is or dip them in chocolate. Or you can use them to make keto rice krispie treat! Yup you heard me right. See the recipe below! Tools You'll Need:
Ingredients: 4 tablespoons unflavored, grass-fed gelatin 1/2 cup cold water 1/2 cup warm/room temperature water 2/3 cup allulose sweetener 2 teaspoons Vanilla extract 1/4 cup powdered sweetener (for dusting) Directions:
Follow us on Social Media | Did you try the recipe? Tag us! @thisketofamily This Keto Family is a participant of the Amazon and other affiliate marketing programs, which means we may get paid commissions on editorially chosen products purchased through our links to retailer sites.
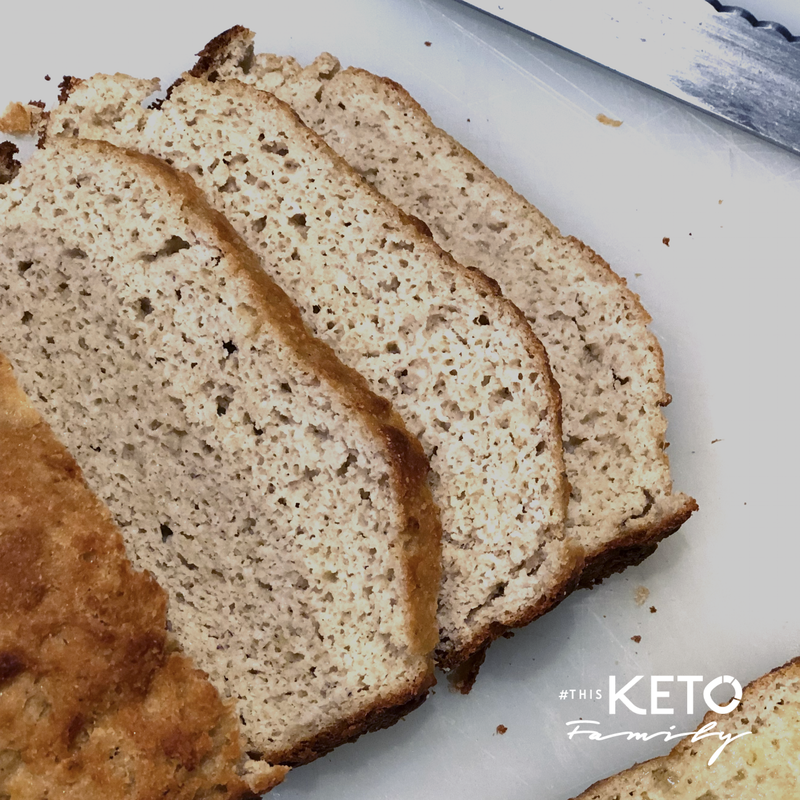 Don't let this recipe intimidate you. I used to think making breads was challenging since I had never before worked with yeast. I also had never worked with Vital Gluten before so that was another uncharted territory. But let me tell you, both are ESSENTIAL to making this low-carb, Keto bread fluffy and soft. Here's why. Ketogenic flours are dense and heavy. They typically consist of almond flour and coconut flour, both of which are course and dry. Neither contain any starches in their makeup (which is what makes them ketogenic LOL) and because their particles are dense, they typically do not rise well. Enter Vital Gluten. Gluten in normal flour is responsible for the sponginess and chewiness of traditional flour bread. It is the protein component of wheat that is extracted and separated from all the starches. Therefore Vital Gluten (also called Wheat Gluten and Vital Wheat Gluten) is actually not 'wheat' at all, but the dried and milled protein. Because of this it is safe for ketogenic baking and supplements for the missing rise of traditional ketogenic flours. Yeast. Yeast are single-celled organisms that thrive on the starches in the flour/wheat and emit carbon dioxide. The carbon dioxide is what makes the pockets of air in traditional flour bread. Air equals rise and chewiness. The problem in ketogenic baking is, again, the keto flours do not contain starch (as traditional wheat flour does), so the yeast has nothing to feed off of. Activating your yeast is essential in keto baking because you will supply it with a small amount of sugar, in our case I use Yacon Root extract or syrup, so activate it. That's it. All you need to do is combine the ingredients, add a little elbow grease to mix them together, patience to allow it to rise and boom - the most amazing low-carb, no dairy, no egg, no-kneading and no bread machine required keto bread recipe there is. I hope you try this, because it is amazing. If you do, let us know how it turns out! Happy baking! Yields: 12 slices Ingredients: 1 cup almond flour 1/4 cup coconut flour 1/4 cup psyllium husk 1/2 cup vital gluten (also called Vital Wheat Gluten) 1/2 cup whey protein isolate 1 1/2 teaspoon salt 13 oz warm water (between 110°-115°) 1 1/4 teaspoon active dry yeast 2 teaspoons yacon syrup Directions:
Follow us on Social Media | Did you try the recipe? Tag us! @thisketofamily This Keto Family is a participant of the Amazon affiliate marketing programs, which means we may get paid commissions on editorially chosen products purchased through our links to retailer sites.
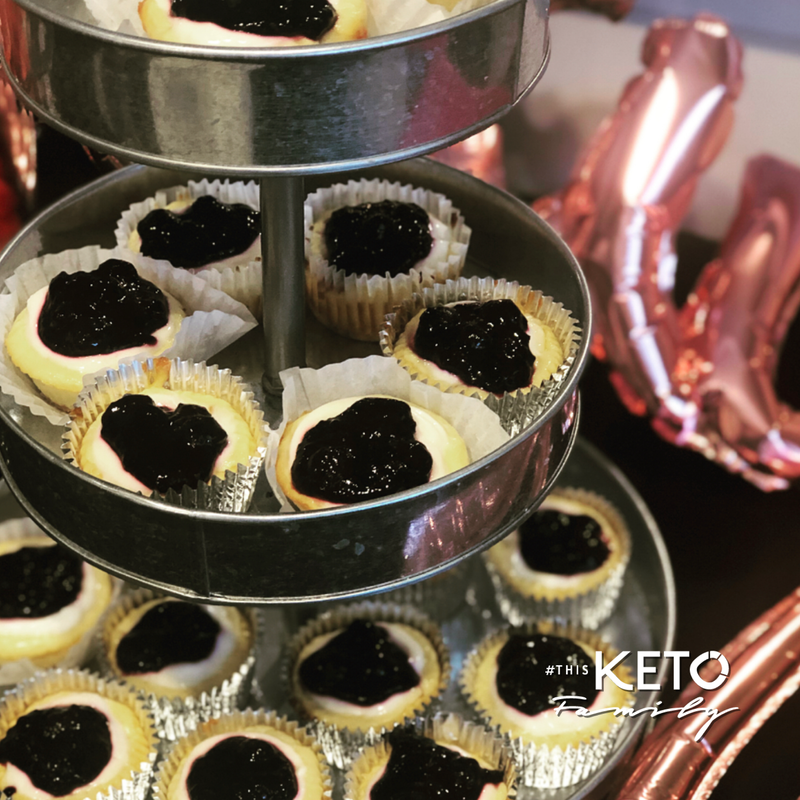
I never was a fan of fat bombs. Something about eating a cold, frozen ball of butter or coconut oil never appealed to me. If this is you, then look no further my friends. These mini cheesecakes—aside from being a great potluck item to bring or have at your next party—these beauties double as a kick butt keto fat bomb.
I kid you not, in the beginning when I first transitioned my family to keto, I would make a batch of these cheesecakes to keep in the fridge and have when I needed a sweet fix or to bump up my fat intake for the day. It almost felt sinful in the beginning to be able to eat a personal sized cheesecake EVERYDAY! As far as potluck worthy, YES! If you plan to bring this to a party make sure you make double the batch so you can save some at home for yourself because I guarantee that there will be none left! These beauties are super easy to make. There are a few steps since you have to bake the crust first and then top them once cooled, but I assure you that it will be all worth it. The best part? Each mini cheesecake is approximately 2.61 net carbs!!!! (Woohoo, happy dance). Before keto I used to make these S.A.D equivalent ("Standard American Diet" equivalent which means with "normal" ingredients and "normal" sugar). Can you guess how many carbs/sugar one "normal" mini cheesecake set you back? 21 grams!! These keto mini cheesecakes are one-tenth the net carbs as a normal one! Wow—I'll take sugar free and keto all day, every day. Do yourself a favor. Pick 1 Sunday afternoon and make these for yourself for the week. Hide them from your family members who aren't keto (or else they'll eat your stash LOL). You're welcome! Tools you'll need
20 mini cheesecakes Ingredients: 4 8-oz blocks cream cheese, room temperature 4 eggs, room temperature 1 cup allulose sweetener 1 teaspoon vanilla extract 1 cup almond flour 1/3 cup Swerve sweetener 3 tablespoons butter Ingredients–Topping: 1 8-oz tub sour cream 1 tablespoon Swerve sweetener 1 teaspoon vanilla extract 1 10-oz bag frozen blueberries 1/2 lemon, juiced 1/2 cup water 3/4 cup allulose sweetener xanthan slurry *Ingredients—Xanthan Slurry: 2 teaspoons coconut oil (or olive oil) 1/2 teaspoon xanthan gum Directions:
USE OUR FAVORITE BRANDS + PRODUCT
Follow us on Social Media | Did you try the recipe? Tag us! @thisketofamily
This Keto Family is a participant of Amazon and other affiliate marketing programs, which means we may get paid commissions on editorially chosen products purchased through our links to retailer sites.
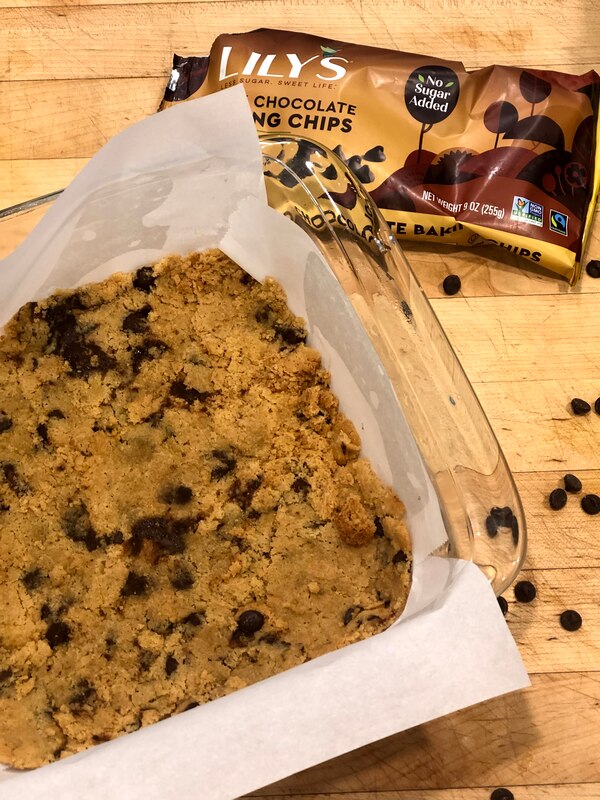
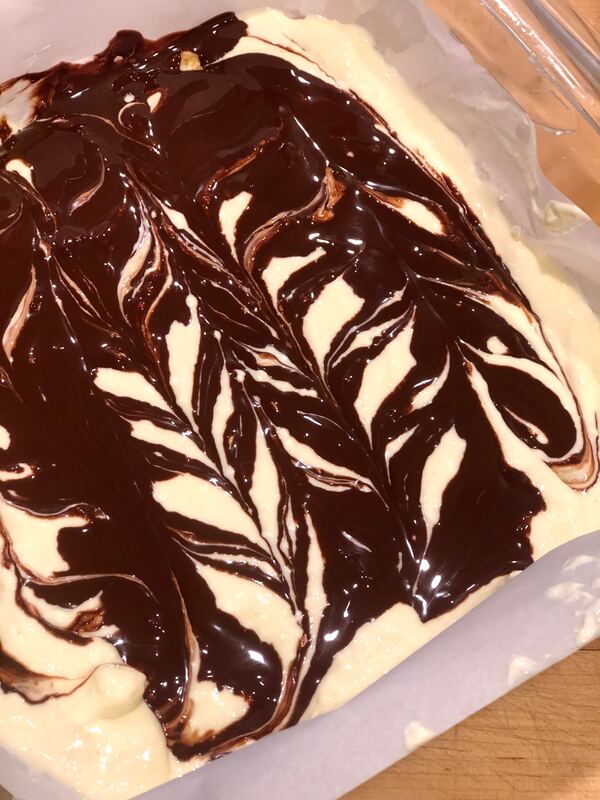
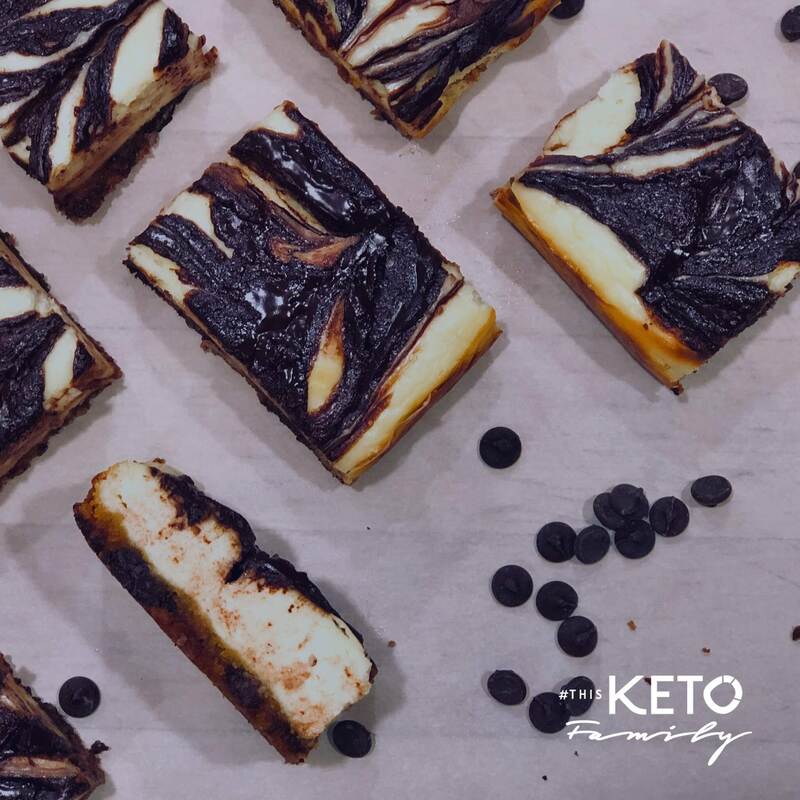 I hate wasting food and love the idea of using leftovers for something new. The other day we made Keto Chocolate Chip Cookies (click for my recipe) and they were delicious, but the recipe yields about 24 cookies. After eating cookies for 4 days in a row, one can become "cookied-out". LOL –hard to image I know. We still had 5 cookies left and since I hate wasting, I wanted to repurpose them. I was debating a cookie ice cream, but decided these cheesecake bars were better! They hit the spot and I love the cookie bottom. Adds a little something extra to these. I used Lily's dark chocolate chips in these (my kids, actually like the taste now), but feel free to use milk chocolate if you want a sweeter end-product. The dark is obviously more keto-friendly, but if that isn't your focus, then go for milk chocolate. Next time I think I'm trying a white chocolate, raspberry cheesecake so stay tuned for that! Makes: 12 Bars Ingredients: 5-6 chocolate chip cookies (or make my Keto Chocolate Chip cookies recipe here) 2 blocks cream cheese, room temperature 2 Eggs room temperature 1/4 Cup + 2 Tablespoons Swerve sweetener 1/2 Teaspoon Vanilla extract 1/4 Cup Lily's chocolate chips 1 Teaspoon Coconut oil Directions:
Follow us on Social Media | Did you try the recipe? Tag us! @thisketofamily This Keto Family is a participant of the Amazon affiliate marketing programs, which means we may get paid commissions on editorially chosen products purchased through our links to retailer sites.
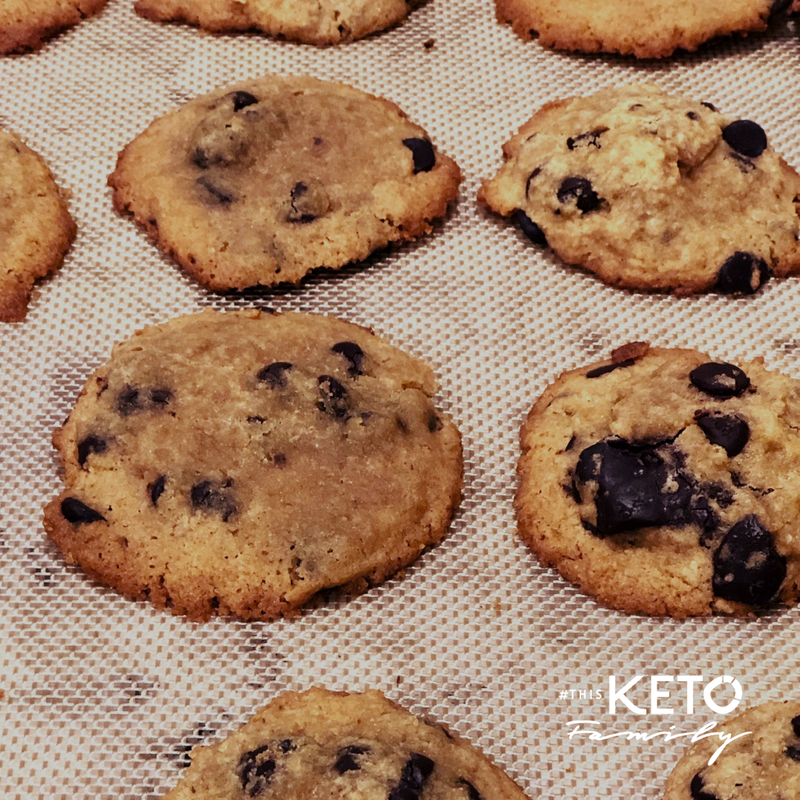 Who doesn't love chocolate chip cookies? I know the first things I craved to learn to master when I transitioned into keto was keto desserts. I mean if I was going to make this a lifestyle, my new keto life better include some delicious desserts. This was one of the first desserts I worked to master. The secret? The brown-butter and coffee! These two ingredients really make a different in the flavor profiles of these cookies. If you've tried other recipes that were so-so, then you need to try this one. It will not disappoint! Also, I suggest making the entire batch, getting them all mixed and freezing them. Then you can pop a few in the oven anytime you need a cookie fix. Or better yet, make mini frozen cookie doughs (about half the size of a normal cookie portion) and eat is as a keto fat bomb straight from the freezer. Yup! You know I do that LOL. Ingredients: 1 cup almond flour 1/4 cup + 2 tablespoons coconut flour 1/4 teaspoon xanthan gum 1/4 teaspoon salt 1/2 teaspoon baking soda 1/2 teaspoon baking powder 1 cup Kerry Gold butter, browned (see steps 1-2) 1/4 cup Swerve Brown 1/4 cup Swerve 1 teaspoon vanilla 2 teaspoon coffee (optional) 1 egg + 1 egg yolk 1/2 cup Lily's dark chocolate chips 3 oz dark chocolate, roughly chopped (adds texture and visual aesthetics) Directions:
Follow us on Social Media | Did you try the recipe? Tag us! @thisketofamily This Keto Family is a participant of the Amazon affiliate marketing programs, which means we may get paid commissions on editorially chosen products purchased through our links to retailer sites.
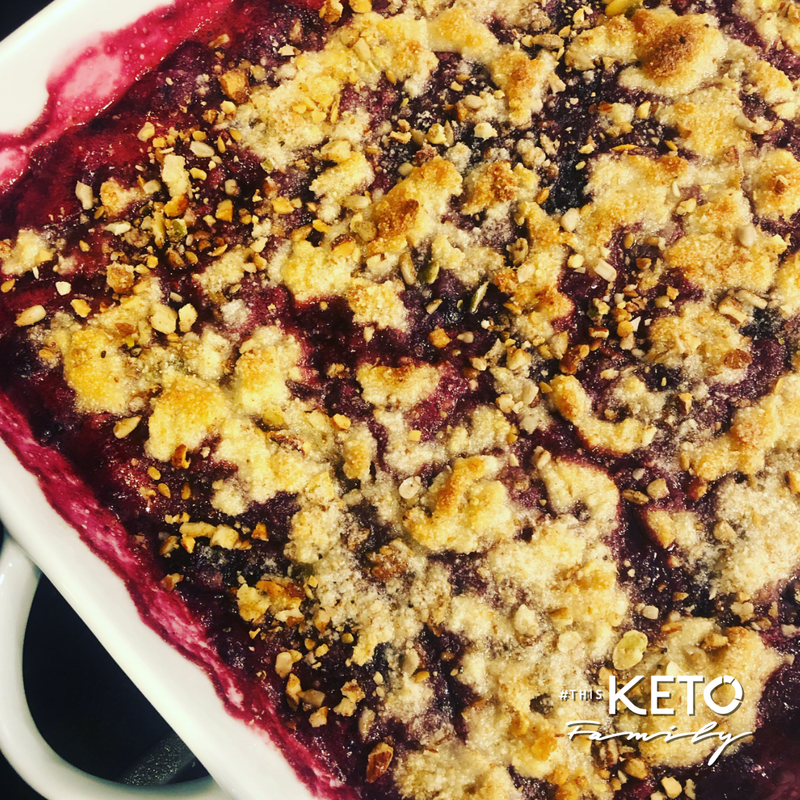
So it has been said that summer hasn't started yet until a good cobbler pie is made, haha. My general philosophy is that there is always room for a good cobbler. The keto berry cobbler recipe is a great one that even non-keto guests would enjoy.
Use fresh or frozen berries of your choice. Thicken it up and then top it off with a almond flour crumble. Bake it until its golden and bubbly and serve it with a side of Keto ice cream! A yummy fruit dessert that is keto friendly and delicious. Ingredients–Berry Filling: 16 ounces fresh or frozen berries Xanthan gum slurry* 1/2 lemon , juiced 2/3 cup allulose sweetener pinch of salt Ingredients–Topping: 1 cup almond flour 2/3 cup Swerve sweetener 4 tablespoons butter 1/4 cup Highkey granola (optional) *Ingredients—Xanthan Slurry: 3 teaspoons coconut oil (or avocado oil) 1 teaspoon xanthan gum Directions:
USE OUR FAVORITE BRANDS + PRODUCT
Follow us on Social Media | Did you try the recipe? Tag us! @thisketofamily
This Keto Family is a participant of the Amazon and other affiliate marketing programs, which means we may get paid commissions on editorially chosen products purchased through our links to retailer sites.
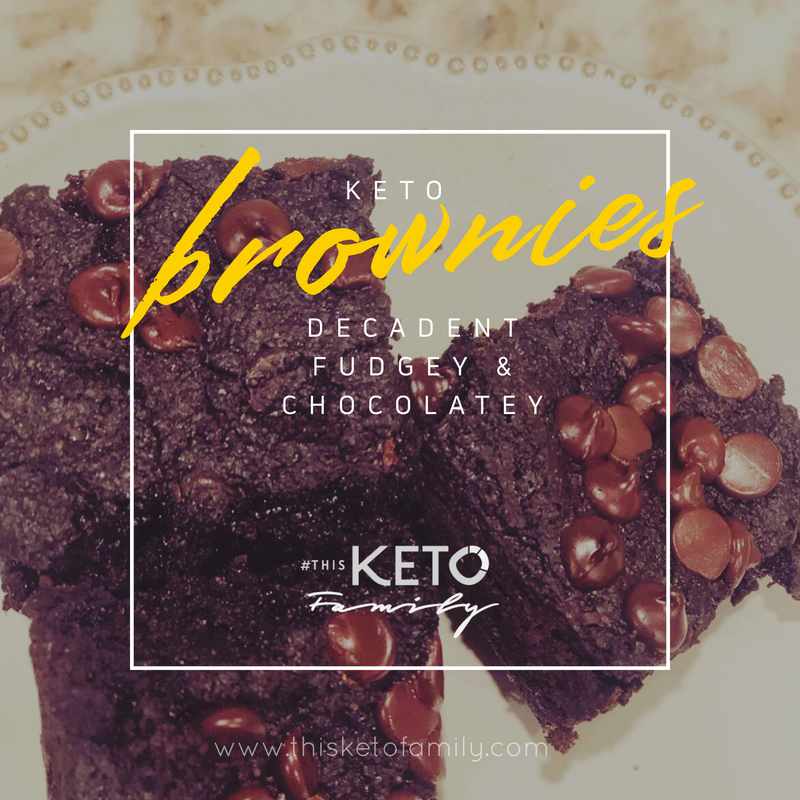 Brownies have a way to making things better. They're warm and gooey and so comforting. Most baked Keto goods are either too eggy or too dry and many keto brownie recipes online fall short — but not this one. If you are searching for a rich, dark, fudgy, chocolatey Keto dessert, then this is for you. I decided to use black cocoa powder for a rich, dark flavor and color. The chocolate chips inside the batter and on top of the brownie offer a nice contrast in color and enhancement of flavor. So what you may ask gives this decadent dessert its fudgy middle? An extra egg yolk. That's it. This recipe is super easy and comes together in under 20 minutes (including bake time). Try to resist eating it right out of the oven. As with any keto baked good, you need to let the item rest and set for at least 15 minutes. Difficult I know, but the wait is worth it—I promise! Ingredients: 1.5 cups almond flour 1/2 cup black cocoa powder 1/2 cup allulose sweetener 1/4 teaspoon xanthan gum 1/4 teaspoon salt 1 tablespoon baking soda 1 egg, plus 1 egg yolk 3/4 cup coconut cream (or heavy whipping cream) 1/2 cup Lily's chocolate chips, divided Directions:
Follow us on Social Media | Did you try the recipe? Tag us! @thisketofamily This Keto Family is a participant of the Amazon affiliate marketing programs, which means we may get paid commissions on editorially chosen products purchased through our links to retailer sites.
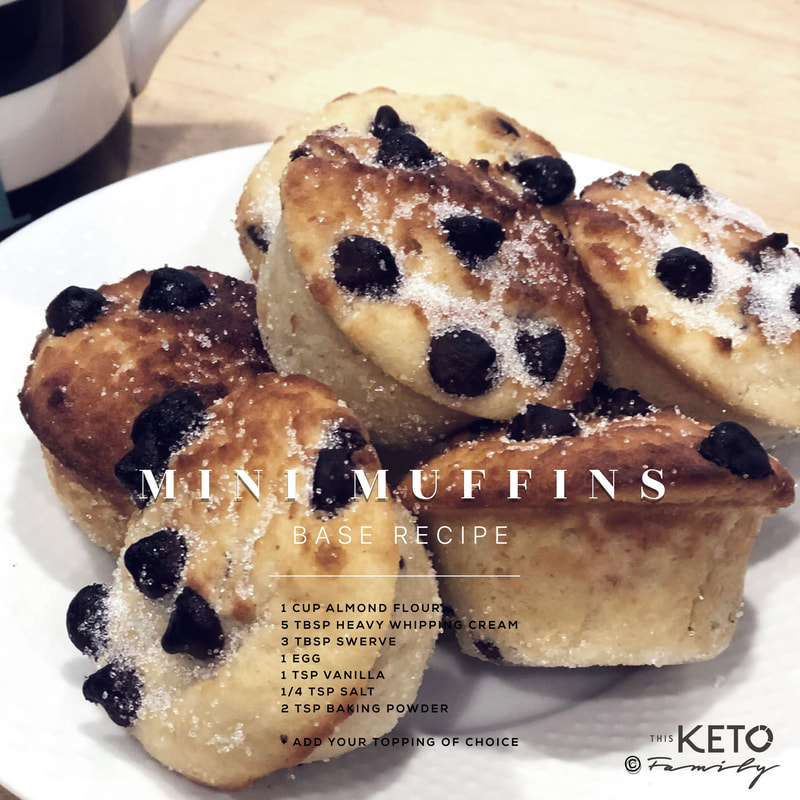 This muffin recipe is super versatile. I use it as the base for many of my baked goods because the result is a moist and fluffy cake that isn't too sweet. This means you can add whatever topping you like. Add some lemon zest and a tablespoon of lemon juice (or 2 drops of Young Living Lemon Essential Oil—my preferred route) and 1/3 cup of fresh blueberries for a yummy lemon-blueberry flavor. Or add a half cup of Lily's Dark Chocolate Chips for a keto chocolate muffin version. Or go full chocolatey goodness with a double-chocolate muffin by adding subbing the base flour with 3/4 cup almond flour and 1/4 cup of unsweetened baker's powdered cocoa. Add in some chocolate chips and another tablespoon of swerve and boom, a keto double-chocolate muffin that tastes sinful with less than 2gram Net Carbs per serving! Have fun with your toppings and flavors. With this base recipe, the sky's the limit! Yields: 12 mini muffins Ingredients: 1 cup almond flour 5 tablespoons heavy whipping cream 3 tablespoons Swerve 1 egg, lightly beaten at room temperature 1 teaspoon vanilla 1/4 teaspoon salt 2 teaspoons baking powder Directions:
Follow us on Social Media | Did you try the recipe? Tag us! @thisketofamily This Keto Family is a participant of the Amazon affiliate marketing programs, which means we may get paid commissions on editorially chosen products purchased through our links to retailer sites.
 If you are just starting Keto and you were a sugar, chocolate addict like I was then pin this recipe because it will be your lifeline. It was mine! Anytime I needed something sweet or chocolatey this was the jam. With only a 5 minute prep and a 90-second cook time, immediacy was everything when a craving hit in my early days of keto. I used to get so good that I'd remember the measurements by heart. Try this keto dessert for a special night or celebration or really anytime the occasion called for it. For my version I decided to use egg whites because it still combined the ingredients well but offered a less eggy taste. I mean who wants to taste an eggy chocolate cake. If you want to be adventurous, stop the microwave at 30 seconds remaining and stick a piece Lily's dark chocolate bar in the center of your cake (which will still be a little wet). Then quickly turn the microwave back on to finish the cooking. This will get you a yummy lava-cake version that oozes melted chocolate when you cut into the cake. After its been microwave, gently invert the mug over a plate to garnish with a few more chocolate chips or a dusting of powdered swerve and some raspberries! This is a great single-serving side that appease any sweet tooth. Serves: 1 Person Ingredients: 2 tablespoons Kerrygold butter, melted 3 tablespoon almond flour 2 teaspoons unsweetened cocoa powder 1 teaspoon baking powder 1 teaspoon vanilla 1 tablespoon sweetener (I like allulose) 3 tablespoons liquid egg whites Pinch of salt Lily's dark chocolate chips Directions:
Follow us on Social Media | Did you try the recipe? Tag us! @thisketofamily This Keto Family is a participant of the Amazon affiliate marketing programs, which means we may get paid commissions on editorially chosen products purchased through our links to retailer sites.
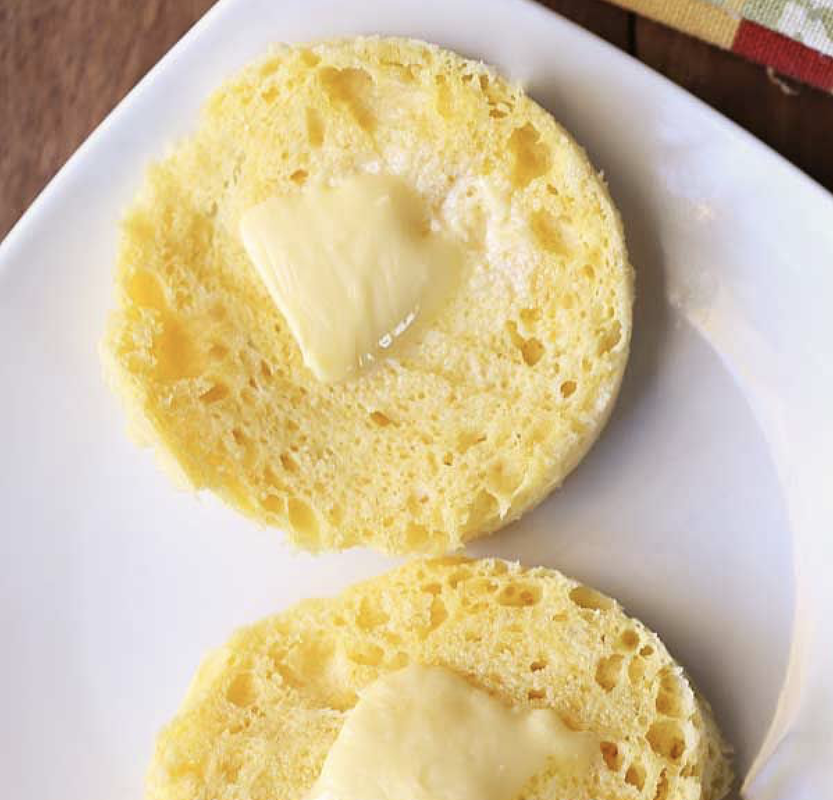 When I first transitioned into keto the hardest thing to go without was bread. Now there are so many ket "breads" on the market. Unfortunately they are still processed and some contain ingredients that are still considered questionable by strict ketoer guidelines. As the ketogenic diet matures and science begins to support and pour more research into toxic food ingredients, I have no doubt that the keto standards will continue to improve and change. What we do know now is that processed ingredients, grains, sugars and "vegetable" oils are all major contributors to an unhealthy diet. And what do we find in ALL standard breads?—bingo! All of these ingredients. This 90-second keto bread is my own slight modified recipe. The normal version you can find online calls for a whole egg which, in my opinion, yielded a very "eggy" and yellow "bread". You *can* still use a whole egg, but just be warned that it won't be so neutral tasting. Instead I used liquid egg whites, about 3 tablespoons. This acts like a great binder to the almond flour, but reduces the "eggy" component significantly, definitely a WIN in my book. Want to toast this? When you take this bread out of the microwave it will be fluffy and delicate. Gently slice the bread in half to make 2 thinner slices and place it in a small toaster oven (or on a griddle or pan) to give it a nice golden toast. Eat it will a pat of kerrygold butter or homemade jelly. Or mash up an avocado and make yourself a fancy keto avocado toast! Either way, this is a great bread alternative for the days when you miss that good old sandwich bread! Ingredients: 1 1/5 tablespoons Kerrygold Butter, melted 3 tablespoons almond flour 3 tablespoons liquid egg whites (or 1 egg*) 1/4 teaspoon baking powder pinch of salt Directions:
Follow us on Social Media | Did you try the recipe? Tag us! @thisketofamily This Keto Family is a participant of the Amazon and other affiliate marketing programs, which means we may get paid commissions on editorially chosen products purchased through our links to retailer sites.
|

AuthorHi! I'm Arlene – wife, mother of 3, entrepreneur and keto foodie. I love to make, share and try different, delicious keto food recipes that are easy to make and most-importantly kid-friendly. Life is hard as it is, feeding our families should be easy, fun and nutritious. Archives
December 2020
Categories
All
|
 RSS Feed
SERVICES |
Recipes |
About |
CONNECT with Us |
©2019-2022 THIS KETO FAMILY ALL RIGHTS RESERVED. | PRIVACY POLICY & DISCLOSURES | CLIENT LOGIN